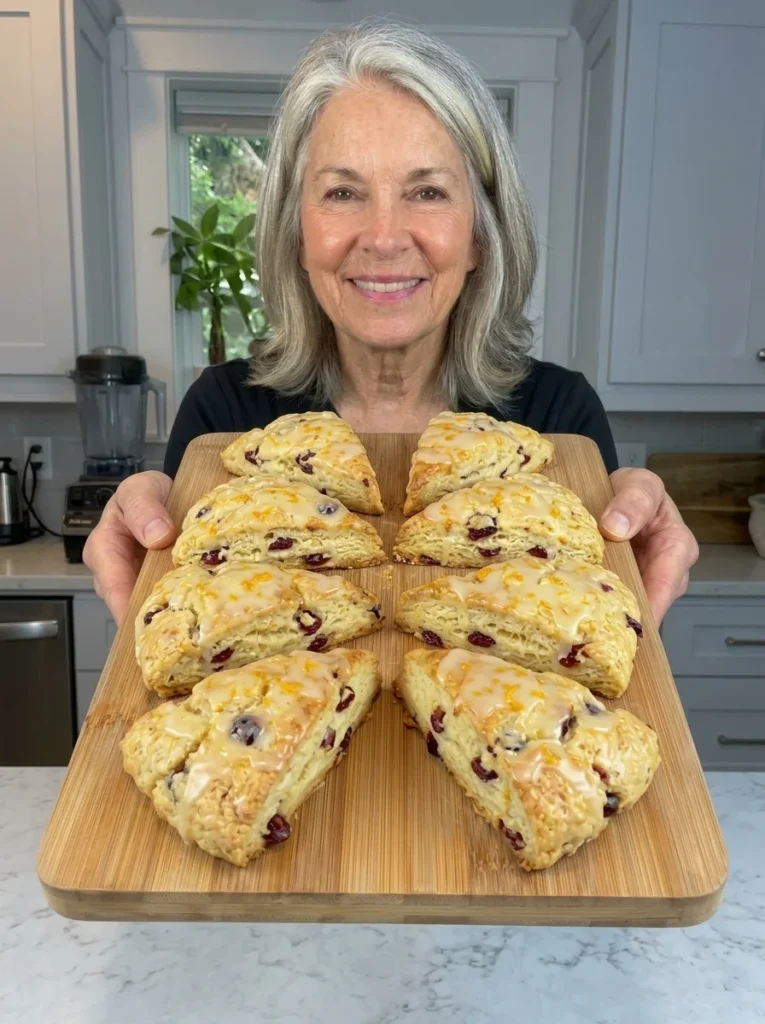
These Cranberry Orange Scones are buttery, tender, flaky, and bursting with bright citrus flavor! Sweet-tart dried cranberries are folded into a soft orange-scented dough, then the scones are baked until beautifully golden and finished with a fresh orange glaze.
Cold butter creates delicate, flaky pockets throughout the dough, while heavy cream and egg keep the centers rich and tender. Fresh orange zest and juice give every bite a vibrant citrus flavor that pairs perfectly with the cranberries.
They’re wonderful for breakfast, brunch, holiday mornings, afternoon coffee, or whenever you’re craving a bakery-style treat you can easily make at home.
Why You’ll Love These Cranberry Orange Scones
These homemade scones combine rich buttery pastry with one of the best sweet-tart flavor combinations.
Soft and flaky. Cold butter creates tender layers and flaky pockets throughout the scones.
Bright orange flavor. Fresh orange zest and juice give the dough a naturally vibrant citrus flavor.
Loaded with cranberries. Dried cranberries provide sweet-tart bursts in every bite.
Easy homemade dough. You don’t need complicated pastry techniques or special equipment.
Beautiful orange glaze. A simple powdered sugar and fresh orange juice glaze adds sweetness and extra citrus flavor.
Perfect for brunch. These scones look impressive enough for holidays, showers, brunches, or special breakfasts.
Freezer-friendly. The baked scones can be frozen for longer storage.
What Makes Cranberry Orange Scones Soft and Flaky?
The secret to flaky scones is keeping the butter cold and handling the dough gently.
Cold pieces of butter remain scattered throughout the dough rather than completely blending into the flour. When the scones enter the hot oven, those pieces melt and help create tender, flaky pockets.
The dough should also be mixed only until it comes together.
Overmixing develops more gluten and can turn delicate scones into something tougher and more bread-like.
Another important step is keeping the dough relatively thick when shaping it. A round approximately 1 inch thick gives the scones enough height to develop soft centers while the outside becomes lightly golden.
If the dough becomes noticeably warm while you’re working with it, chilling the shaped scones for 10 to 15 minutes before baking can help firm the butter again.
Ingredients for Cranberry Orange Scones
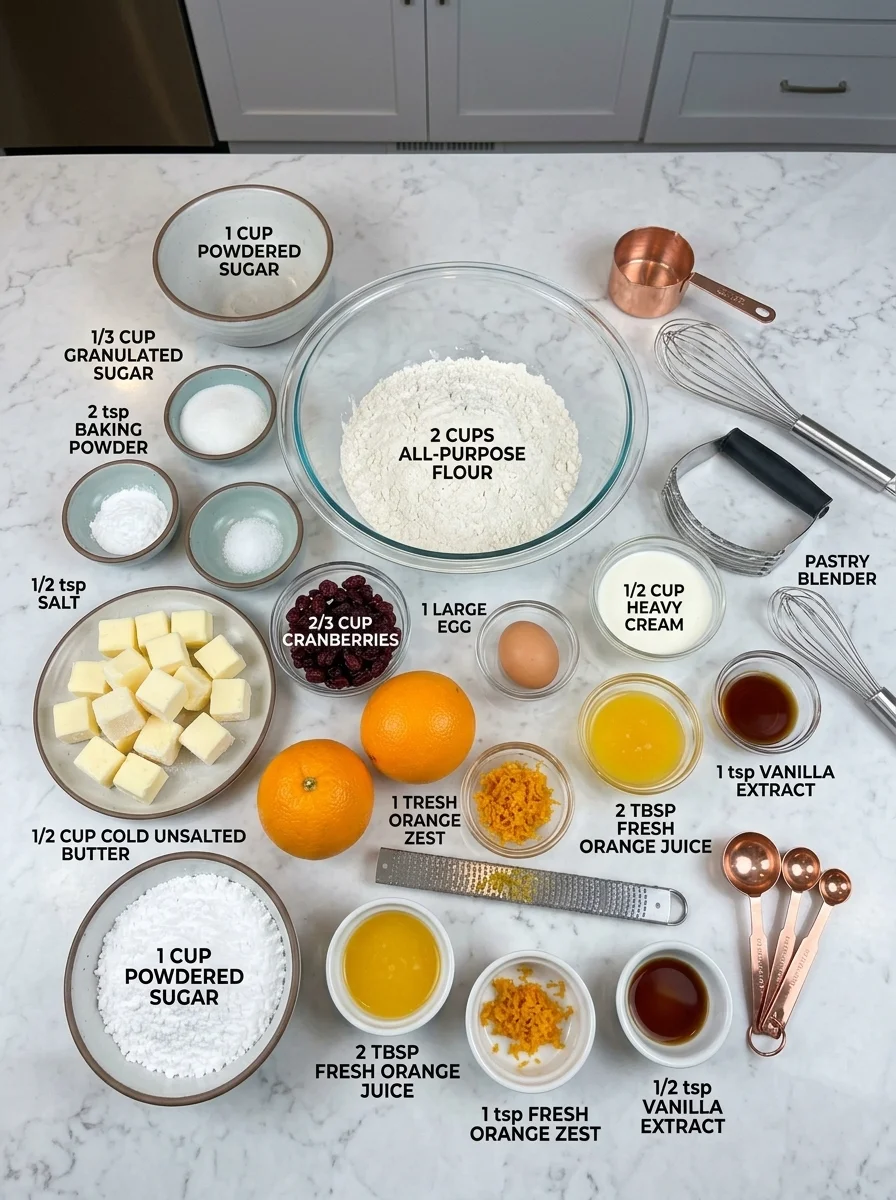
For the Scones
- 2 cups all-purpose flour
- 1/3 cup granulated sugar
- 2 tsp baking powder
- 1/2 tsp salt
- 1 tbsp fresh orange zest
- 1/2 cup cold unsalted butter, cut into small cubes
- 2/3 cup dried cranberries
- 1 large egg
- 1/2 cup heavy cream
- 2 tbsp fresh orange juice
- 1 tsp vanilla extract
- Additional heavy cream, for brushing the tops
For the Orange Glaze 🍊
- 1 cup powdered sugar
- 2 tbsp fresh orange juice
- 1 tsp fresh orange zest
- 1/2 tsp vanilla extract
Ingredient Notes
All-purpose flour: Provides the structure for the scones while still allowing them to remain tender.
Granulated sugar: Adds enough sweetness to balance the tart cranberries and fresh citrus.
Baking powder: Gives the scones lift in the oven and helps create a lighter texture.
Salt: Balances the sweetness and enhances the butter and orange flavors.
Fresh orange zest: One of the most important flavor ingredients. The zest contains aromatic citrus oils that give the scones their pronounced orange flavor.
Cold unsalted butter: Essential for flaky scones. Keep the butter cold until it goes into the oven.
Dried cranberries: Provide concentrated sweet-tart cranberry flavor without adding excessive moisture to the dough.
Egg: Adds richness and helps bind the dough.
Heavy cream: Provides moisture and richness, helping create a soft, tender center.
Fresh orange juice: Reinforces the citrus flavor in both the scones and glaze.
Vanilla extract: Softens and rounds out the bright orange and cranberry flavors.
Powdered sugar: Creates a smooth, sweet glaze when mixed with orange juice.
How to Make Cranberry Orange Scones
Step 1: Preheat the Oven
Preheat the oven to 400°F (200°C).
Line a baking sheet with parchment paper.
Starting with a fully preheated oven is important because the high initial heat helps the scones rise while the cold butter melts.
Step 2: Combine the Dry Ingredients
In a large mixing bowl, whisk together:
- All-purpose flour
- Granulated sugar
- Baking powder
- Salt
- Fresh orange zest
Whisk until the orange zest is evenly distributed throughout the flour mixture.
Step 3: Cut in the Cold Butter
Add the cold cubed butter to the flour mixture.
Using a pastry cutter, two forks, or your fingertips, quickly work the butter into the flour.
Stop when the mixture resembles coarse crumbs with some pea-size pieces of butter still visible.
Don’t try to make the mixture completely uniform.
Those visible pieces of butter are exactly what help create flaky pockets in the baked scones.
Step 4: Add the Cranberries
Stir in the dried cranberries.
Distribute them evenly throughout the flour and butter mixture before adding the wet ingredients.
This helps prevent excessive mixing later.
Step 5: Combine the Wet Ingredients
In a separate small bowl or measuring cup, whisk together:
- 1 large egg
- 1/2 cup heavy cream
- 2 tablespoons fresh orange juice
- 1 teaspoon vanilla extract
Whisk until smooth and evenly combined.
Step 6: Make the Scone Dough
Pour the wet mixture into the dry ingredients.
Using a fork or spatula, gently mix until a shaggy dough begins to form.
Avoid vigorous stirring.
The dough does not need to look completely smooth.
If a few dry-looking areas remain, they can be incorporated during the gentle folding step.
Step 7: Gently Fold the Dough
Turn the dough onto a lightly floured work surface.
Gently bring it together with your hands.
Fold the dough over itself approximately 2 to 3 times.
This helps create additional flaky layers without requiring traditional kneading.
Avoid repeatedly kneading or compressing the dough.
Step 8: Shape the Dough
Shape the dough into a round approximately 1 inch thick.
Try to keep the thickness relatively even so all the scones bake at a similar rate.
Step 9: Cut Into Wedges
Using a sharp knife or bench scraper, cut the round into 8 wedges.
Transfer the wedges to the prepared baking sheet, leaving a little space between them.
Step 10: Chill if Necessary
If the dough still feels cold and firm, you can proceed directly to baking.
If the butter has softened noticeably while shaping, refrigerate the scones for approximately 10 to 15 minutes.
This helps firm the butter before the scones enter the oven.
Step 11: Brush With Heavy Cream
Lightly brush the top of each scone with a little heavy cream.
This encourages attractive golden browning while keeping the surface tender.
Step 12: Bake
Bake at 400°F (200°C) for approximately 17 to 21 minutes.
The scones are ready when they have risen, the tops are lightly golden, and the edges look baked through.
Avoid overbaking, which can dry out the centers.
Step 13: Cool
Remove the baking sheet from the oven.
Allow the scones to cool for approximately 10 minutes before glazing.
If they’re extremely hot when the glaze is added, most of it will melt and run off.
Make the Fresh Orange Glaze 🍊
While the scones cool, prepare the glaze.
In a small bowl, combine:
- 1 cup powdered sugar
- 2 tablespoons fresh orange juice
- 1 teaspoon fresh orange zest
- 1/2 teaspoon vanilla extract
Whisk until smooth.
The glaze should be thick enough to cling to the scones but fluid enough to drizzle.
If necessary, adjust the consistency with a very small amount of additional orange juice or powdered sugar.
Glaze the Scones
Drizzle the orange glaze over the slightly cooled scones.
Allow the glaze to sit for several minutes so it can begin to set.
Serve the scones slightly warm or at room temperature.
Time and Yield
Prep time: 20 minutes
Cook time: approximately 19 minutes
Total time: approximately 39 minutes
Yield: 8 scones
Estimated calories: approximately 350 calories per scone
If you chill the shaped scones before baking, add approximately 10 to 15 minutes to the total preparation time.
Tips for the Best Cranberry Orange Scones
Keep the butter cold. This is one of the most important rules for flaky scones.
Use fresh orange zest. The zest provides significantly more aromatic orange flavor than juice alone.
Don’t eliminate all the butter pieces. Small visible pieces of butter in the flour mixture are desirable.
Don’t overmix the dough. Stop as soon as it comes together.
Fold instead of kneading. Two or three gentle folds help create layers without making the scones tough.
Keep the dough thick. Approximately 1 inch gives the scones enough height to develop tender centers.
Use a sharp cutter. Clean cuts help the edges rise more evenly.
Chill warm dough. If your kitchen is warm or the butter has softened, refrigerate the shaped scones briefly before baking.
Don’t overbake. Remove the scones once they’re lightly golden and baked through.
Cool before glazing. Waiting about 10 minutes prevents the glaze from immediately disappearing into the hot scones.
Why Cold Butter Matters
Cold butter is one of the biggest differences between tender, flaky scones and dense ones.
The goal isn’t to completely blend the butter into the flour.
Instead, you want small pieces distributed throughout the dough.
When the cold scones enter the hot oven, those butter pieces melt. The moisture in the butter creates steam while the surrounding dough sets, contributing to flaky pockets and a tender texture.
If the butter melts before baking, you lose some of this effect.
That’s why it’s important to:
- Start with cold butter.
- Work quickly.
- Avoid excessively handling the dough.
- Chill the shaped scones if they become warm.
Serving Ideas
Cranberry orange scones are especially delicious while slightly warm.
Breakfast: Serve with coffee, tea, or fresh fruit.
Brunch: Add them to a spread with eggs, fruit, muffins, and other breakfast favorites.
Holiday mornings: Cranberry and orange flavors make these especially fitting for fall and winter breakfasts.
Afternoon coffee: Enjoy a glazed scone with coffee or hot tea.
With butter: Split a warm scone and spread it lightly with softened butter.
With orange marmalade: For even more citrus flavor, serve alongside a little orange marmalade.
Cranberry Orange Scone Variations
The basic cranberry-orange combination is already packed with flavor, but a few simple variations can change the finished scones.
Extra-orange scones: Add a little additional fresh zest for a stronger citrus aroma.
Unglazed cranberry orange scones: Skip the glaze for a less-sweet breakfast scone.
Extra-cranberry scones: Increase the cranberry presence slightly if you prefer more fruit in every bite.
Vanilla orange glaze: Increase the vanilla slightly for a softer, bakery-style glaze flavor.
Thicker glaze: Use slightly less orange juice.
Thinner glaze: Add orange juice a few drops at a time until the glaze reaches your preferred consistency.
Troubleshooting Common Scone Problems
Why are my scones dense?
The dough may have been overmixed or kneaded too much.
Handle it only enough to bring the ingredients together and shape the round.
Why did my scones spread?
The butter may have become too warm before baking.
Chilling the shaped scones for 10 to 15 minutes can help when the dough feels soft or warm.
Why are my scones dry?
Too much flour, overmixing, or overbaking can all create dry scones.
Measure carefully and remove them once they’re lightly golden and baked through.
Why aren’t my scones flaky?
The butter may have been incorporated too finely or become warm before baking.
Leave some pea-size pieces of cold butter visible in the flour mixture.
Why didn’t my scones rise?
Check that your baking powder is fresh and avoid flattening the dough too thin.
The dough should be approximately 1 inch thick before cutting.
Why is my glaze disappearing?
The scones are probably too hot.
Allow them to cool for about 10 minutes before drizzling the glaze.
Why is my glaze too thin?
Whisk in additional powdered sugar until it thickens.
Why is my glaze too thick?
Add fresh orange juice a few drops at a time until it becomes drizzleable.
Storage and Reheating
Cranberry orange scones are best when fresh, but leftovers can be stored successfully.
Room temperature: Keep cooled scones in an airtight container for up to 2 days.
Refrigerator: Store in an airtight container for up to 5 days. Allow them to come closer to room temperature or warm them gently before serving.
Freezer: Freeze the baked scones for up to 2 months in a freezer-safe container or bag.
For best results, separate layers with parchment paper if stacking them.
Reheating: Warm unglazed or lightly glazed scones gently in a low oven until heated through.
If you’re preparing the scones specifically for freezing, you may prefer freezing them without glaze and adding fresh orange glaze after reheating.
Frequently Asked Questions
Can I make Cranberry Orange Scones without a mixer?
Yes. No electric mixer is required. A pastry cutter, two forks, or your fingertips can be used to cut the cold butter into the flour.
Can I use dried cranberries?
Yes. This recipe is specifically designed with 2/3 cup dried cranberries.
Do I need to soak the cranberries first?
No. They can be added directly to the dry ingredients.
Can I use bottled orange juice?
Fresh orange juice is preferable here because you’re already using fresh zest and the juice is an important part of the citrus flavor.
Why do I need orange zest if I’m already using orange juice?
Orange zest contains aromatic oils that provide a more concentrated orange aroma than juice alone.
Can I skip the orange glaze?
Yes. The scones already contain orange zest and juice, so they’re flavorful even without glaze.
How thick should the dough be?
Shape it into a round approximately 1 inch thick before cutting it into wedges.
How many scones does this recipe make?
The dough is cut into 8 scones.
Can I make them ahead?
Yes. You can bake them ahead and store them in an airtight container, or freeze them for longer storage.
Can Cranberry Orange Scones be frozen?
Yes. Baked scones can be frozen for up to 2 months.
Final Thoughts
These Cranberry Orange Scones bring together buttery pastry, sweet-tart cranberries, and fresh citrus in a simple bakery-style treat you can make right at home.
Keeping the butter cold and handling the dough gently creates the tender, flaky texture, while fresh orange zest and juice give the scones their bright flavor. Dried cranberries add chewy bursts of fruit, and the fresh orange glaze brings everything together with an extra layer of citrus sweetness.
Serve them slightly warm with coffee or tea, add them to a weekend brunch spread, or make a batch for a cozy holiday breakfast. With their golden edges, tender centers, colorful cranberries, and bright orange glaze, they’re an easy homemade scone you’ll want to make again and again.
Print
Cranberry Orange Scones
- Total Time: approximately 39 minutes
Ingredients
For the Scones
- 2 cups all-purpose flour
- 1/3 cup granulated sugar
- 2 tsp baking powder
- 1/2 tsp salt
- 1 tbsp fresh orange zest
- 1/2 cup cold unsalted butter, cut into small cubes
- 2/3 cup dried cranberries
- 1 large egg
- 1/2 cup heavy cream
- 2 tbsp fresh orange juice
- 1 tsp vanilla extract
- Additional heavy cream, for brushing the tops
For the Orange Glaze 🍊
- 1 cup powdered sugar
- 2 tbsp fresh orange juice
- 1 tsp fresh orange zest
- 1/2 tsp vanilla extract
Instructions
Step 1: Preheat the Oven
Preheat the oven to 400°F (200°C).
Line a baking sheet with parchment paper.
Starting with a fully preheated oven is important because the high initial heat helps the scones rise while the cold butter melts.
Step 2: Combine the Dry Ingredients
In a large mixing bowl, whisk together:
- All-purpose flour
- Granulated sugar
- Baking powder
- Salt
- Fresh orange zest
Whisk until the orange zest is evenly distributed throughout the flour mixture.
Step 3: Cut in the Cold Butter
Add the cold cubed butter to the flour mixture.
Using a pastry cutter, two forks, or your fingertips, quickly work the butter into the flour.
Stop when the mixture resembles coarse crumbs with some pea-size pieces of butter still visible.
Don’t try to make the mixture completely uniform.
Those visible pieces of butter are exactly what help create flaky pockets in the baked scones.
Step 4: Add the Cranberries
Stir in the dried cranberries.
Distribute them evenly throughout the flour and butter mixture before adding the wet ingredients.
This helps prevent excessive mixing later.
Step 5: Combine the Wet Ingredients
In a separate small bowl or measuring cup, whisk together:
- 1 large egg
- 1/2 cup heavy cream
- 2 tablespoons fresh orange juice
- 1 teaspoon vanilla extract
Whisk until smooth and evenly combined.
Step 6: Make the Scone Dough
Pour the wet mixture into the dry ingredients.
Using a fork or spatula, gently mix until a shaggy dough begins to form.
Avoid vigorous stirring.
The dough does not need to look completely smooth.
If a few dry-looking areas remain, they can be incorporated during the gentle folding step.
Step 7: Gently Fold the Dough
Turn the dough onto a lightly floured work surface.
Gently bring it together with your hands.
Fold the dough over itself approximately 2 to 3 times.
This helps create additional flaky layers without requiring traditional kneading.
Avoid repeatedly kneading or compressing the dough.
Step 8: Shape the Dough
Shape the dough into a round approximately 1 inch thick.
Try to keep the thickness relatively even so all the scones bake at a similar rate.
Step 9: Cut Into Wedges
Using a sharp knife or bench scraper, cut the round into 8 wedges.
Transfer the wedges to the prepared baking sheet, leaving a little space between them.
Step 10: Chill if Necessary
If the dough still feels cold and firm, you can proceed directly to baking.
If the butter has softened noticeably while shaping, refrigerate the scones for approximately 10 to 15 minutes.
This helps firm the butter before the scones enter the oven.
Step 11: Brush With Heavy Cream
Lightly brush the top of each scone with a little heavy cream.
This encourages attractive golden browning while keeping the surface tender.
Step 12: Bake
Bake at 400°F (200°C) for approximately 17 to 21 minutes.
The scones are ready when they have risen, the tops are lightly golden, and the edges look baked through.
Avoid overbaking, which can dry out the centers.
Step 13: Cool
Remove the baking sheet from the oven.
Allow the scones to cool for approximately 10 minutes before glazing.
If they’re extremely hot when the glaze is added, most of it will melt and run off.
- Prep Time: 20 minutes
- Cook Time: approximately 19 minutes
Nutrition
- Serving Size: 8 scones
- Calories: approximately 350 calories per scone