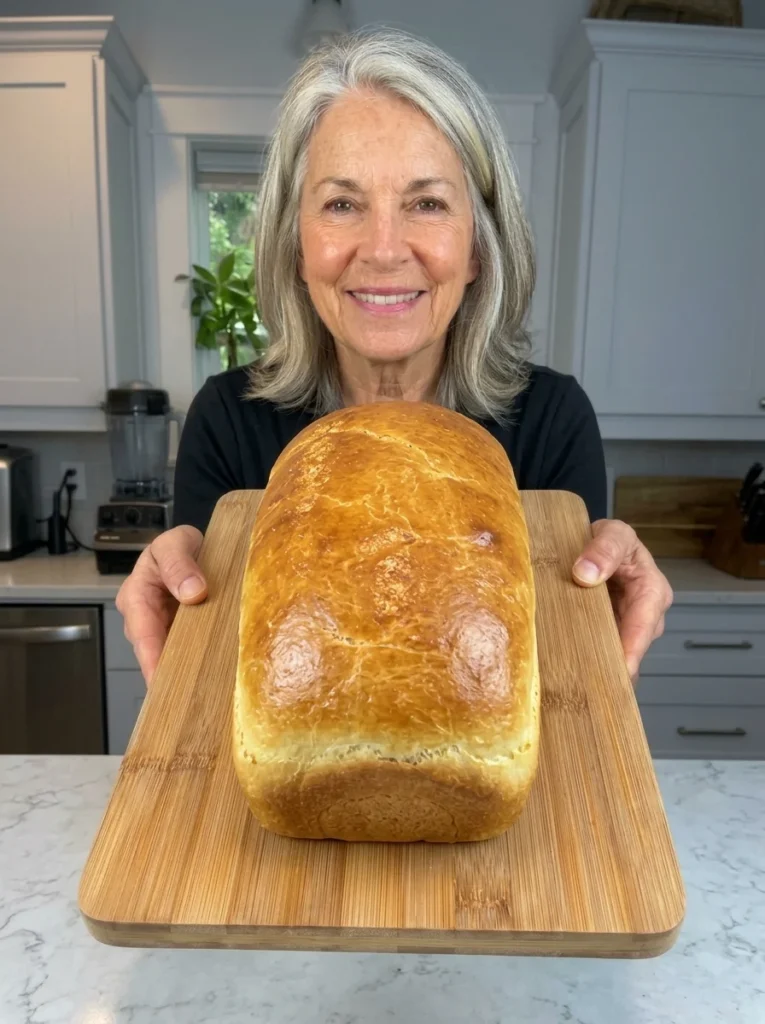
This Overnight No-Knead Sandwich Loaf is soft, fluffy, lightly chewy, and incredibly easy to make with almost no hands-on work. The dough is mixed in minutes, left to slowly rise overnight, then shaped and baked the next day into a beautifully golden loaf with a tender crumb that’s perfect for sandwiches and toast.
The long overnight fermentation does most of the work for you. Instead of kneading, time allows the dough to develop structure and flavor while you sleep. A little honey adds subtle sweetness, while olive oil or melted butter keeps the crumb soft enough for everyday sandwich bread.
It’s an excellent homemade loaf for sandwiches, breakfast toast, grilled cheese, French toast, or simply warm slices spread with butter.
Why You’ll Love This Overnight No-Knead Sandwich Loaf
No kneading required. Mix the ingredients with a spoon and let the overnight fermentation develop the dough.
Prepare it before bed. Most of the rising happens while you sleep.
Soft sandwich texture. The loaf has enough structure for slicing but remains tender inside.
Simple pantry ingredients. You only need flour, yeast, salt, water, honey, and a little fat.
Better flavor from a long rise. Slow fermentation gives this simple bread more depth than a very fast loaf.
Easy to slice. Baking in a loaf pan creates a practical shape for sandwiches and toast.
Freezer-friendly. Slice the cooled loaf before freezing and you can remove individual pieces whenever needed.
Ingredients for Overnight No-Knead Sandwich Loaf
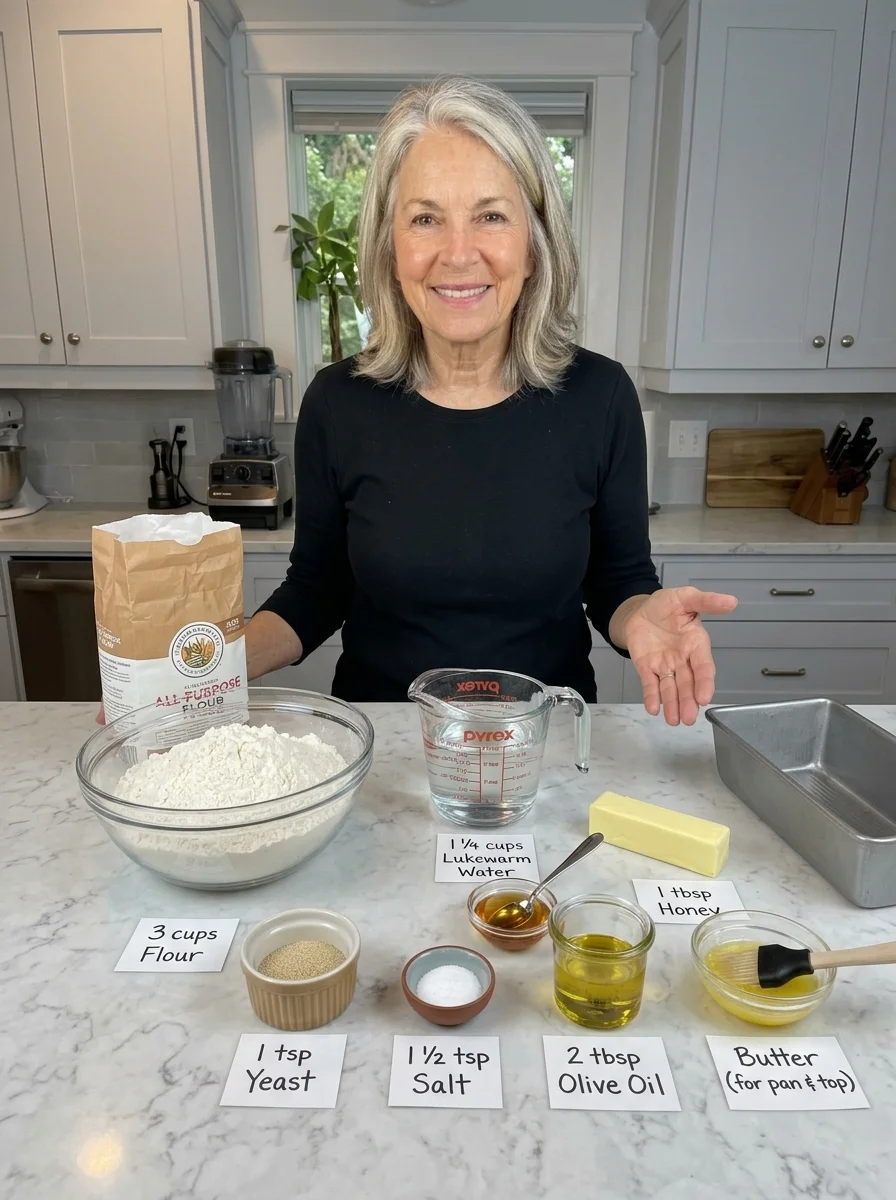
For the Dough
- 3 cups (360 g) all-purpose flour
- 1 tsp instant yeast
- 1 1/2 tsp fine salt
- 1 1/4 cups (300 ml) lukewarm water
- 1 tbsp honey
- 2 tbsp olive oil or melted unsalted butter
For the Pan and Top
- Butter or oil, for greasing the loaf pan
- 1 tbsp melted butter, optional, for brushing the baked loaf
Ingredient Notes
All-purpose flour: Creates a soft, versatile loaf with enough structure to hold sandwich fillings without becoming overly chewy.
Instant yeast: Only a modest amount is needed because the dough has plenty of time to ferment overnight.
Salt: Essential for flavor and also helps regulate fermentation during the long rise.
Lukewarm water: Hydrates the flour and helps bring the dough together. It should feel comfortably warm, not hot.
Honey: Adds subtle sweetness and complements the mild flavor of homemade sandwich bread.
Olive oil or melted butter: Helps create a softer, more tender crumb. Olive oil keeps the recipe simple, while butter provides a slightly richer flavor.
Melted butter for finishing: Optional, but brushing the hot crust softens it slightly and adds extra richness.
How to Make Overnight No-Knead Sandwich Bread
Step 1: Combine the Dry Ingredients
In a large mixing bowl, combine:
- 3 cups all-purpose flour
- 1 teaspoon instant yeast
- 1 1/2 teaspoons salt
Stir until the yeast and salt are evenly distributed through the flour.
Step 2: Add the Wet Ingredients
Add the lukewarm water, honey, and olive oil or melted butter.
Use a sturdy wooden spoon or spatula to stir until all the flour is hydrated.
The dough should be soft, sticky, and somewhat shaggy.
Don’t continue adding flour simply because the dough feels sticky. This moisture helps create a softer finished loaf.
Step 3: Cover the Dough
Cover the bowl tightly with plastic wrap or another well-fitting cover.
The dough now needs time rather than kneading to develop.
Step 4: Let It Rise Overnight 🌙
Leave the covered dough at a cool room temperature for approximately 8 to 12 hours.
By morning, it should look expanded and bubbly and have a noticeably fermented aroma.
The exact fermentation speed depends on the temperature of your kitchen.
If your room is particularly warm, check the dough toward the shorter end of the rising range.
Shape the Sandwich Loaf
Step 5: Prepare the Loaf Pan
Lightly grease a 9 x 5-inch loaf pan with butter or oil.
Make sure the corners and sides are coated to help the baked bread release easily.
Step 6: Turn Out the Dough
Lightly flour your work surface.
Gently scrape the risen dough out of the bowl.
Avoid aggressively punching it down.
The dough will naturally lose some gas during shaping, but gentle handling helps preserve its light texture.
Step 7: Shape Into a Loaf
With lightly floured hands, gently stretch the dough into a rough rectangle approximately as wide as your loaf pan.
Fold the outer edges inward, then roll or fold the dough into a compact loaf.
Pinch the seam gently to help seal it.
Place the shaped dough into the prepared loaf pan with the seam facing downward.
Don’t worry about creating a perfectly smooth bakery-style shape. The dough will expand considerably during its final rise.
Second Rise
Cover the loaf pan loosely with a clean kitchen towel or lightly greased plastic wrap.
Allow the dough to rise for approximately 45 to 75 minutes, or until noticeably puffy.
The dough should rise toward the top of the loaf pan and may begin to dome slightly above the rim.
The exact timing will depend on the temperature of the dough and your kitchen.
Preheat the Oven
Toward the end of the second rise, preheat the oven to 375°F (190°C).
Allow it to become fully preheated before baking.
Bake the Sandwich Loaf 🍞🔥
Bake the loaf for approximately 35 to 40 minutes.
The bread should become beautifully golden brown across the top.
If the surface is browning too quickly before the loaf is finished, loosely tent it with aluminum foil during the final portion of baking.
For additional certainty, the center of the loaf should register approximately 190–200°F on an instant-read thermometer.
Brush With Butter
Remove the loaf from the oven.
For a softer crust, immediately brush the top lightly with melted butter.
This step is optional but works particularly well when you’re making the bread specifically for sandwiches.
Cool Completely
Let the bread rest in the pan for approximately 10 minutes.
Carefully remove it and transfer it to a wire rack.
Allow the loaf to cool completely before slicing.
This can be difficult when freshly baked bread smells so good, but cooling is important.
The interior is still setting as the loaf cools. Cutting it while extremely hot can compress the crumb and make the slices appear gummy.
Time and Yield
Prep time: approximately 10 minutes
Overnight rise: 8 to 12 hours
Second rise: 45 to 75 minutes
Bake time: 35 to 40 minutes
Total time: approximately 10 to 14 hours, mostly hands-off
Yield: 1 loaf
Servings: approximately 12 slices
Estimated calories: approximately 150 calories per slice
Why Does Overnight No-Knead Bread Work?
Traditional bread recipes often use kneading to develop the gluten network responsible for trapping gases produced by yeast.
With no-knead bread, time does much of that work instead.
Once flour and water are mixed together, the flour begins hydrating. During the long resting period, the dough gradually develops structure while the yeast slowly ferments.
This slow process gives you two major benefits:
Better texture: The dough develops enough strength to create a light, cohesive loaf without intensive kneading.
More developed flavor: A longer fermentation gives the bread more character than an extremely fast rise.
The following morning, only gentle shaping and a final rise are needed before baking.
Tips for the Best No-Knead Sandwich Bread
Don’t add too much flour. The dough should be soft and sticky rather than firm and dry.
Measure flour carefully. Scooping flour heavily into a measuring cup can add significantly more flour than intended.
Use instant yeast. It can be mixed directly into the flour without a separate proofing step.
Don’t use hot water. Lukewarm water is sufficient.
Cover the bowl well. This prevents the dough surface from drying during the long fermentation.
Pay attention to temperature. Dough ferments faster in a warm kitchen and more slowly in a cool one.
Handle the risen dough gently. There’s no need to aggressively punch it down.
Let the shaped loaf become visibly puffy. Don’t bake immediately after shaping.
Fully preheat the oven. Consistent heat helps the loaf rise and brown properly.
Brush with butter for a softer crust. This is especially useful for sandwich bread.
Cool before slicing. The crumb needs time to finish setting after baking.
How to Tell When the Dough Has Fermented Enough
After the overnight rise, the dough should look very different from when you first mixed it.
Look for:
- Noticeable expansion
- A soft, relaxed appearance
- Bubbles on or beneath the surface
- A mildly fermented aroma
- A slightly jiggly texture when the bowl is moved
The dough doesn’t have to reach one exact size.
Temperature has a major effect on fermentation, so visual signs are often more useful than following the clock alone.
What If My Kitchen Is Warm?
An overnight dough can ferment much faster in a warm kitchen.
If your room is particularly warm, use the shorter end of the fermentation window and check the dough earlier.
You don’t want the dough to rise dramatically and then completely collapse before you shape it.
A cooler environment provides a slower, more forgiving overnight fermentation.
What Makes This a Good Sandwich Bread?
Rustic artisan breads often have extremely large holes and thick, chewy crusts.
Those characteristics can be delicious, but they aren’t always ideal for sandwiches.
This loaf is designed to be more practical.
Baking it in a 9 x 5-inch loaf pan gives you evenly shaped slices, while the olive oil or butter keeps the interior tender.
The crumb is soft enough for everyday sandwiches while still having the homemade texture and flavor you expect from a slowly fermented bread.
Serving Ideas
Sandwiches
Use the cooled slices for turkey, chicken, tuna, egg salad, grilled vegetables, or your favorite sandwich fillings.
Grilled Cheese
The bread’s soft interior and golden crust work especially well for grilled cheese sandwiches.
Breakfast Toast
Toast slices until golden and serve with butter, jam, honey, peanut butter, or eggs.
French Toast
Slightly stale slices are excellent for soaking up a French toast custard.
Garlic Toast
Brush slices with garlic butter and toast until crisp around the edges.
Soup and Stew
Serve thick slices alongside tomato soup, chicken soup, chili, or hearty stews.
Simple Buttered Bread
Fresh homemade bread doesn’t need much. A warm slice with softened butter can be one of the best ways to enjoy it.
Easy Flavor Variations
Honey Butter Sandwich Bread
Use melted butter in the dough and brush the warm loaf generously with additional melted butter.
Herb Sandwich Loaf
Add dried herbs to the flour mixture for a savory bread that works especially well with sandwiches.
Garlic Herb Bread
Add garlic powder and your favorite dried herbs for a savory variation.
Seeded Sandwich Loaf
Sprinkle seeds over the surface before baking for extra texture.
Oat-Topped Loaf
Lightly moisten the surface and sprinkle rolled oats over the dough before baking.
Troubleshooting Common Bread Problems
Why is my dough extremely sticky?
Some stickiness is expected.
No-knead dough relies on sufficient hydration to produce a soft crumb.
Use lightly floured or damp hands when necessary rather than repeatedly adding flour to the dough.
Why didn’t my dough rise overnight?
The room may have been cold, or your yeast may not have been active.
Give the dough additional time in a warmer location and look for visible bubbles and expansion.
Why did my dough rise and then collapse?
The dough may have fermented too long, particularly in a warm kitchen.
Next time, shorten the overnight fermentation or use a cooler location.
Why is my sandwich loaf dense?
Several factors can cause a dense loaf:
- Adding too much flour
- Insufficient overnight fermentation
- Not allowing enough time for the second rise
- Using inactive yeast
- Handling the dough too aggressively
The shaped loaf should be visibly puffy before it enters the oven.
Why didn’t my loaf rise above the pan?
It may simply need more time during the second rise.
Rather than following the clock exactly, wait until the dough looks noticeably expanded and airy.
Why is my bread gummy inside?
The loaf may have been underbaked or sliced while it was still very hot.
Bake until properly cooked through and allow it to cool completely before slicing.
Why is the crust too hard for sandwich bread?
Brush the hot loaf with melted butter after baking.
As it cools, the crust will soften.
Why is my bread dry?
Too much flour or overbaking are common causes.
Keep the dough soft during mixing and begin checking the loaf toward the lower end of the baking range.
Storage Information 🥡
Allow the loaf to cool completely before storing.
Room Temperature
Store in an airtight container or tightly sealed bread bag for approximately 3 days.
Keeping air away from the sliced loaf helps prevent it from drying out.
Refrigerator
Refrigeration can cause bread to become stale faster, so room-temperature storage is generally preferable for short-term use.
Freezer
For longer storage, freeze the loaf for up to 2 months.
For maximum convenience, slice the bread before freezing.
Place parchment between slices if desired, then store them in a freezer-safe bag.
Individual frozen slices can then be removed whenever you need them.
Reheating
Toast individual slices directly from frozen or allow them to thaw at room temperature.
For a larger portion of the loaf, warm gently in the oven until soft and heated through.
Frequently Asked Questions
Do I really need to knead this bread?
No. The long fermentation gives the dough time to develop without traditional kneading.
How long should the dough rise overnight?
Approximately 8 to 12 hours, depending on room temperature and the activity of your yeast.
Can I leave it longer than 12 hours?
Fermentation time depends strongly on temperature. In a warm environment, excessively long fermentation can cause the dough to overproof and weaken.
What size loaf pan should I use?
A 9 x 5-inch loaf pan works well for this recipe.
Why is my dough sticky?
The soft, sticky consistency is intentional and helps produce a tender crumb.
Should I punch the dough down after the overnight rise?
There’s no need to aggressively punch it down. Gently transfer and shape the dough instead.
How do I know when the second rise is finished?
The shaped dough should look noticeably puffy and rise toward the top of the loaf pan.
What temperature should I bake sandwich bread?
This loaf bakes at 375°F (190°C).
How do I know when it’s fully baked?
The exterior should be golden brown and the bread should be cooked through. An instant-read thermometer inserted into the center should read approximately 190–200°F.
Why should I wait before slicing?
The crumb continues setting as the bread cools. Slicing immediately can compress the interior and create a gummy-looking texture.
Can I freeze this sandwich bread?
Yes. Freeze it for up to 2 months. Slicing before freezing makes individual portions much easier to use.
What’s the best way to keep the crust soft?
Brush the top with melted butter immediately after baking and allow the loaf to cool before storing.
Final Thoughts
This Overnight No-Knead Sandwich Loaf is an easy way to make soft, sliceable homemade bread without spending time kneading dough.
Mix everything together in the evening, let the yeast and time work overnight, then gently shape the dough the following day and give it one final rise before baking. The result is a beautifully golden loaf with a soft, tender crumb, subtle sweetness, and more developed flavor from the long fermentation.
Slice it for sandwiches, toast it for breakfast, turn it into grilled cheese or French toast, or simply enjoy a fresh slice with butter.
With just a few basic ingredients and mostly hands-off preparation, it’s the kind of simple homemade bread recipe that can easily become part of your regular baking routine.
Print
Overnight No-Knead Sandwich Loaf
Ingredients
For the Dough
- 3 cups (360 g) all-purpose flour
- 1 tsp instant yeast
- 1 1/2 tsp fine salt
- 1 1/4 cups (300 ml) lukewarm water
- 1 tbsp honey
- 2 tbsp olive oil or melted unsalted butter
For the Pan and Top
- Butter or oil, for greasing the loaf pan
- 1 tbsp melted butter, optional, for brushing the baked loaf
Instructions
Step 1: Combine the Dry Ingredients
In a large mixing bowl, combine:
- 3 cups all-purpose flour
- 1 teaspoon instant yeast
- 1 1/2 teaspoons salt
Stir until the yeast and salt are evenly distributed through the flour.
Step 2: Add the Wet Ingredients
Add the lukewarm water, honey, and olive oil or melted butter.
Use a sturdy wooden spoon or spatula to stir until all the flour is hydrated.
The dough should be soft, sticky, and somewhat shaggy.
Don’t continue adding flour simply because the dough feels sticky. This moisture helps create a softer finished loaf.
Step 3: Cover the Dough
Cover the bowl tightly with plastic wrap or another well-fitting cover.
The dough now needs time rather than kneading to develop.
Step 4: Let It Rise Overnight 🌙
Leave the covered dough at a cool room temperature for approximately 8 to 12 hours.
By morning, it should look expanded and bubbly and have a noticeably fermented aroma.
The exact fermentation speed depends on the temperature of your kitchen.
If your room is particularly warm, check the dough toward the shorter end of the rising range.
Shape the Sandwich Loaf
Step 5: Prepare the Loaf Pan
Lightly grease a 9 x 5-inch loaf pan with butter or oil.
Make sure the corners and sides are coated to help the baked bread release easily.
Step 6: Turn Out the Dough
Lightly flour your work surface.
Gently scrape the risen dough out of the bowl.
Avoid aggressively punching it down.
The dough will naturally lose some gas during shaping, but gentle handling helps preserve its light texture.
Step 7: Shape Into a Loaf
With lightly floured hands, gently stretch the dough into a rough rectangle approximately as wide as your loaf pan.
Fold the outer edges inward, then roll or fold the dough into a compact loaf.
Pinch the seam gently to help seal it.
Place the shaped dough into the prepared loaf pan with the seam facing downward.
Don’t worry about creating a perfectly smooth bakery-style shape. The dough will expand considerably during its final rise.