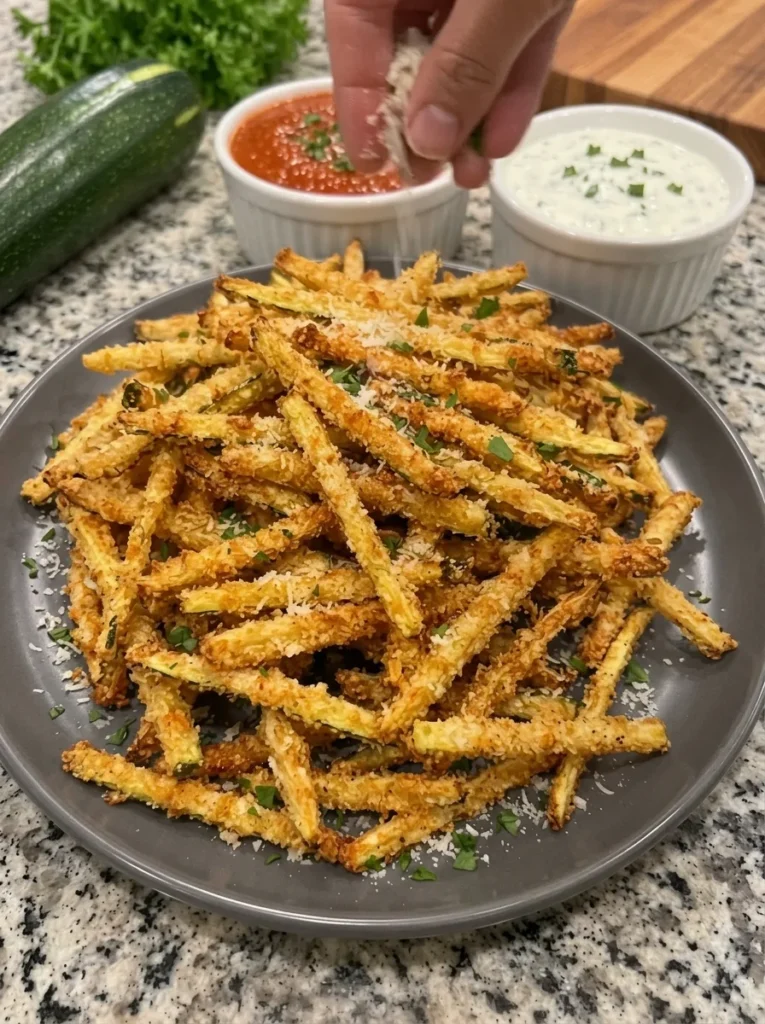
These zucchini fries pair tender vegetable centers with a golden Parmesan-panko coating. Cut into narrow matchsticks, lightly floured, dipped in egg, and coated with seasoned crumbs, they bake into a savory snack that is best served straight from the oven. Garlic, smoked paprika, and Italian seasoning give the breading enough flavor to stand on its own, while marinara, ranch, or garlic aioli makes an easy accompaniment.
The texture comes from the coating rather than from turning the zucchini itself into a dry potato-style fry. Zucchini contains plenty of water, so the middle stays soft and juicy while the panko browns. Dry surfaces, consistent cuts, and enough space on the pan make the difference between a crisp coating and a damp one.
You can bake the fries on a suitable oven-safe rack or directly on a lightly greased, parchment-lined baking sheet. An air fryer is another option, particularly for smaller batches. Whichever method you choose, keep the pieces in a single layer and serve promptly for the best contrast between crunchy crumbs and tender zucchini.
Recipe note: This article expands the supplied recipe with practical preparation guidance. It has not been independently kitchen-tested. Zucchini size, coating pickup, appliance performance, and batch size can affect the yield and cooking time.
What to Expect
At approximately a quarter inch thick, these are slender breaded zucchini sticks. The name “shoestring” describes their narrow shape, but they are thicker than very fine potato shoestrings. Cutting them much thinner can make breading awkward and allow the vegetable to soften before the crumbs color.
The exterior should be golden and lightly crunchy, with visible panko texture. The inside should be tender without collapsing into watery pulp. They are crispiest shortly after cooking and soften as vegetable moisture moves into the coating.
This is an oven-baked vegetable side, not a guarantee of the same texture as deep-fried potatoes. A light oil mist encourages browning, but generous air space and proper preparation matter just as much.
Recipe at a Glance
- Prep time: About 20 minutes; allow longer for careful breading
- Oven time: Approximately 15–20 minutes
- Brief rest: About 2 minutes
- Total time: Approximately 40–45 minutes for one oven batch
- Servings: 4 side portions
- Yield: Approximately 4 cups, depending on zucchini size and coating
- Oven temperature: 425°F
- Air-fryer starting point: 400°F for approximately 8–12 minutes per batch
Multiple pans or air-fryer batches increase the total elapsed time. The stated yield is approximate; two medium zucchini are not a standardized weight, and a loose cup of breaded strips varies with how the pieces settle.
Ingredients
For the Zucchini Fries
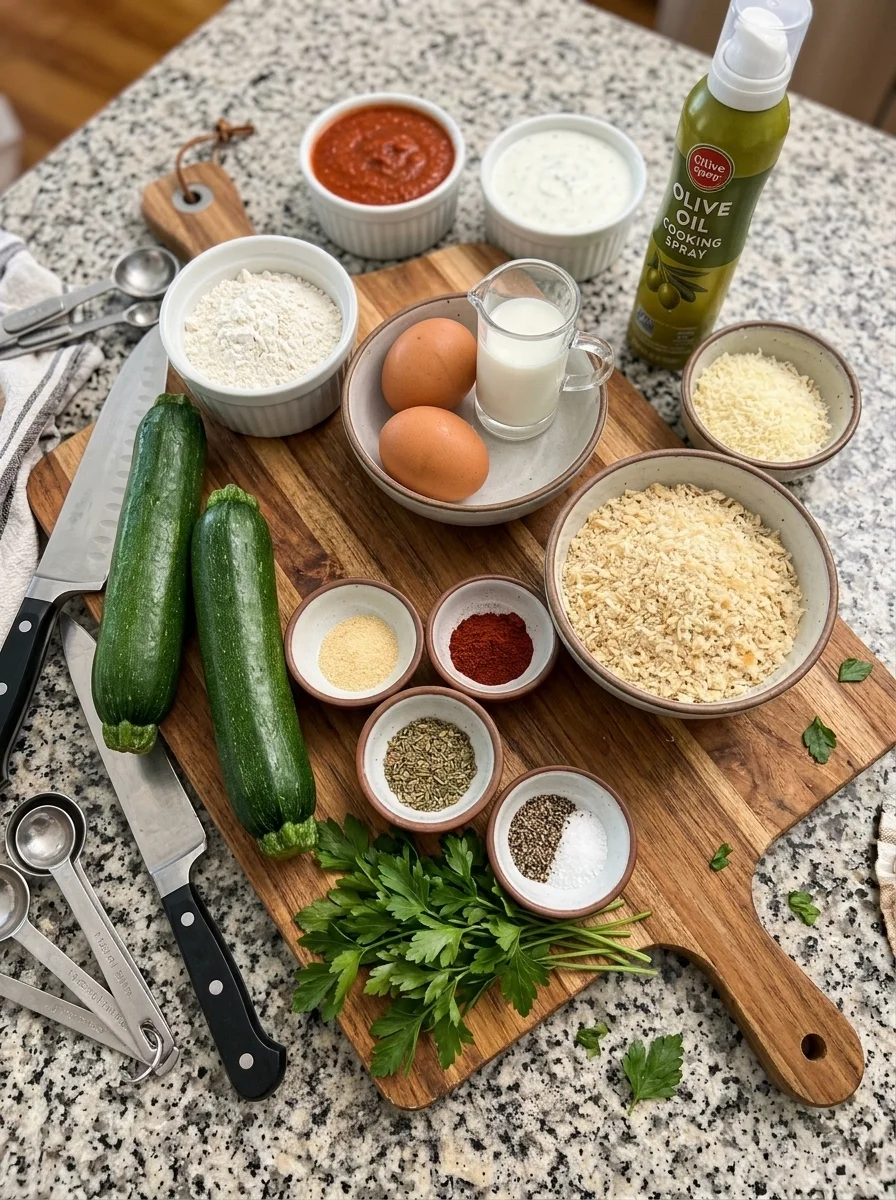
- 2 medium zucchini
- ½ cup all-purpose flour
- 2 large eggs
- 1 tablespoon milk
- 1 cup panko breadcrumbs
- ½ cup finely grated Parmesan cheese
- ½ teaspoon garlic powder
- ½ teaspoon smoked paprika
- ½ teaspoon Italian seasoning
- ¼ teaspoon freshly ground black pepper
- ¼ teaspoon salt
- Olive oil cooking spray, as needed for a light coating
Optional for Serving
- Ranch dressing
- Warm marinara sauce
- Garlic aioli
- Chopped fresh parsley
- Extra grated Parmesan
The flour, egg, and breadcrumb quantities provide enough material for a workable breading station. You may not use every bit. Discard coating ingredients that have contacted raw egg or egg-coated zucchini instead of saving them for a later recipe.
Choosing the Zucchini
Choose firm, medium zucchini with smooth skin and no soft spots. Smaller, tender zucchini generally have less developed seed sections and are easier to cut into consistent sticks. The green skin can stay on and helps some pieces hold their shape.
Very large garden zucchini may have coarse seeds and a soft, watery center. If using one, remove the developed seed section and any tough skin, then use the firmer flesh. Because the recipe starts with two medium zucchini, substituting a giant specimen without adjusting the coating can produce a much larger batch.
Wash before cutting, then dry the skin well. Once cut, blot the exposed surfaces with clean paper towels or a kitchen towel. Surface moisture can turn the flour into a thick paste and make the coating uneven.
Understanding the Coating
A Light Flour Layer
Flour gives the egg something to cling to. The goal is a thin dusting, not a heavy white shell. Shake off excess before moving to the egg bowl so dry flour does not collect in lumps beneath the breadcrumbs.
If flour starts turning into wet clumps in the bowl, work with a smaller clean portion rather than dragging every stick through a damp paste. A wide shallow dish helps you coat the strips without bending or breaking them.
Egg and Milk
Whisk the eggs and milk thoroughly so there are no long strands of unbroken egg white. Let excess egg drip away after dipping. Too much liquid carries into the crumbs and creates sticky clumps that are harder to distribute.
The milk loosens the egg slightly; it is not a soaking liquid. A brief dip is enough. Work in small groups so each stick receives a coating without sitting in egg for an extended period.
Panko and Parmesan
Panko gives the breading its irregular, airy texture. Finely grated Parmesan fills some gaps, adds savory flavor, and helps the surface color. Large cheese shreds do not distribute as evenly through the crumbs.
The seasoning belongs in the panko mixture in this version. If using particularly salty Parmesan, you can reduce the added salt. Additional Parmesan at serving time is optional and contributes more salt as well as cheese flavor.
Equipment and Pan Setup
Gather a sharp knife, stable cutting board, three shallow bowls, baking sheet, parchment suitable for 425°F, and tongs or a thin spatula. An oven-safe wire rack is optional. Use a rack explicitly suitable for oven use, not an unknown coated cooling rack.
If the rack has wide gaps, slender strips can fall through or catch while turning. In that case, bake directly on a lightly greased lined pan. Direct pan contact can brown the underside well, provided the pieces are spaced and turned carefully.
Keep parchment within its temperature rating and away from heating elements. The optional broiler step needs a separate broiler-safe setup without parchment. You can omit broiling entirely and finish the fries with ordinary baking heat.
How to Cut Even Matchsticks
Trim both ends of each zucchini. Cut into manageable lengths, approximately three to four inches if desired, then slice lengthwise into quarter-inch planks. Lay the planks flat and cut them into quarter-inch sticks.
Work with a small, stable stack or cut one plank at a time. A flat side against the cutting board makes the vegetable easier to control. Aim for similar thickness rather than perfect square ends on every piece.
Separate unusually thin pieces from thicker ones. Thin strips may be ready sooner and can be removed early. Avoid leaving a mixture of very thick batons and hair-thin strands on one pan, because they will not reach the same texture together.
Step-by-Step Oven Method
1. Preheat and Prepare the Pan
Preheat the oven to 425°F with a rack near the center. Line a large baking sheet with suitable parchment. If using an oven-safe wire rack, set it securely on the pan and grease it lightly; otherwise lightly grease the lined baking surface.
Have a second pan available if the zucchini will not fit with space between pieces. Crowding one pan to avoid using another usually compromises the coating more than it saves effort.
2. Cut and Dry the Zucchini
Wash, dry, trim, and cut the zucchini into approximately quarter-inch matchsticks. Lay the strips on a clean towel and blot the cut surfaces thoroughly. Turn them over and blot again if visibly damp.
Do not squeeze the sticks as you would grated zucchini for fritters. They need to retain their shape. Drying the surface is the goal, while accepting that the vegetable will still contain moisture inside.
3. Set Up Three Bowls
Place flour in the first shallow bowl. Whisk eggs and milk in the second. In the third, combine panko, Parmesan, garlic powder, smoked paprika, Italian seasoning, black pepper, and salt.
Mix the crumbs well so the seasoning does not stay in one corner. Place the prepared pan beside the final bowl to reduce handling after breading. A dry hand for flour and crumbs and a separate hand for egg can help keep the station cleaner.
4. Dust with Flour
Work with a few zucchini sticks at a time. Turn them through the flour, then lift and shake gently to remove excess. All sides should have a light coating without thick patches.
Avoid placing a large pile in the bowl at once. Sticks can stick together and leave wet surfaces uncoated. A little attention here makes the following layers easier to apply evenly.
5. Dip in Egg
Move the floured sticks into the egg mixture and coat all sides. Lift them out and let excess drip back into the bowl before transferring to the crumbs.
Use tongs if easier, but handle gently so the narrow pieces remain intact. Do not carry a spoonful of egg into the panko; it will clump the breading and leave later pieces less evenly covered.
6. Apply the Panko Coating
Roll the strips through the seasoned crumbs and press lightly to help them adhere. Lift onto the prepared rack or baking sheet. Small bare spots are preferable to a heavy, lumpy coating that falls off during cooking.
If the crumb bowl becomes damp, add a reserved clean portion if available. You can start with part of the mixture in the working bowl and replenish as needed, which keeps more of it dry during breading.
7. Space and Mist
Arrange the strips in one layer with a little space between them. They should not overlap or form a mound. Lightly mist the tops with olive oil cooking spray, following the product instructions.
Aim for a thin, even film rather than soaking the crumbs. If your spray leaves concentrated wet patches, move it more evenly or use a suitable oil mister. Extra oil alone will not prevent crowded zucchini from steaming.
8. Bake and Turn
Bake for approximately fifteen to twenty minutes, turning carefully around halfway through. Begin checking around twelve minutes, especially if some strips are thinner. Use tongs or a spatula and avoid scraping away the coating.
Look for golden crumbs, set breading, and tender zucchini. Because raw egg is used in the coating, it should be fully cooked; 160°F is the target for egg-containing mixtures where a reliable reading is practical. A representative thicker piece is easier to check than a very fine strip.
9. Finish Browning if Necessary
If the zucchini is tender but the surface is slightly pale, continue baking briefly while watching closely. For optional broiling, first transfer to an appropriate broiler-safe metal setup without parchment and confirm that any rack is broiler-safe.
Broil only briefly, watching continuously. Parmesan and crumbs can burn quickly, and the additional handling may not be worthwhile for a small color difference. A golden baked finish is enough.
10. Rest Briefly and Serve
Remove from the oven and let stand for about two minutes. Transfer to a platter in a loose layer and add optional parsley or Parmesan. Serve the dip beside the fries.
Do not cover tightly or pour sauce over the batch. Both trap or add moisture and soften the coating. The fries are best eaten warm soon after this short rest.
Air-Fryer Method
Prepare and bread the zucchini in the same way. Preheat the air fryer according to its instructions, using 400°F as a starting temperature. Lightly coat the basket if appropriate for the appliance and arrange a single layer of strips with space around them.
Mist the coating lightly with oil. Cook for approximately eight to twelve minutes, checking early and turning gently midway. Delicate breading may release if shaken aggressively, so careful turning is often more useful than vigorous basket shaking.
Appliances vary considerably, and narrow strips can cook faster than expected. Check for golden, cooked coating and tender zucchini rather than treating the timer as a guarantee. Work in batches, removing loose burnt crumbs if needed between rounds.
Avoid putting loose parchment into an empty preheating air fryer. Follow the appliance instructions for liners and airflow. A solid liner can limit circulation and change browning, so do not assume the lined and unlined basket will cook identically.
Tips for the Crispest Coating
Keep the zucchini surfaces dry before flouring. Apply thin, even layers, and allow excess egg to drip off. A thick coating can look generous before baking but remain heavy and damp underneath.
Give the pieces room. Zucchini releases steam as it heats, and tightly packed strips keep that moisture around the crumbs. If using two oven pans, rotate their positions as necessary and expect timing to vary.
Serve without delay. These fries do not hold their texture like a dry cracker, and no amount of initial browning prevents moisture migration indefinitely. Plan the rest of the meal so the zucchini can come out near serving time.
Troubleshooting
The Coating Falls Off
Check that the zucchini was dried, lightly floured, and drained of excess egg before breading. Press crumbs on gently and avoid moving the pieces repeatedly before their coating sets. Handle carefully when turning.
The Fries Are Pale
The oven may not be fully heated, the pan may be crowded, or the coating may lack a light oil film. Check those conditions before extending cooking substantially. Overbaking can soften the zucchini even while the crumbs slowly darken.
The Zucchini Is Soggy
Very thick pieces, an overcrowded pan, or waiting too long to serve can contribute. Next time, cut consistent quarter-inch sticks and use more pan space. The inside will remain tender, but it should not be watery or collapsed.
The Crumbs Burn
Thin strips or a hot air fryer may cook quickly. Begin checking early, reduce the temperature if necessary, and keep pieces away from excessively close heating elements. Parmesan can darken faster than plain breadcrumbs.
The Breading Bowls Turn Clumpy
Carry less egg into the crumb bowl and work with smaller portions of breading. Separate wet and dry utensils or hands where practical. Replace a heavily damp working portion rather than trying to force sticky clumps onto every remaining strip.
Variations and Substitutions
Different seasoning: Add a small pinch of cayenne or crushed red pepper for heat. Lemon zest can provide brightness, but avoid adding lemon juice to the breading because it introduces moisture.
Regular breadcrumbs: Fine dry breadcrumbs can replace panko, though the coating will be denser and less craggy. Watch browning and avoid assuming the texture will be identical.
Gluten-free adaptation: Use suitable gluten-free flour and panko, and check seasoning and sauce labels. Different products adhere and brown differently, so try a small batch first.
Dairy-free adaptation: Omitting Parmesan changes flavor and breading volume. A suitable alternative may work, but it needs its own adjustment rather than a promise of identical results. The egg remains part of the standard recipe.
Yellow squash: Firm yellow summer squash can be cut and breaded similarly. Remove developed seed sections when necessary and expect moisture differences.
Serving and Meal Planning
Marinara complements the Parmesan and herbs without competing with them. Ranch and garlic aioli provide a creamy contrast but make a richer serving. Keep sauces in small bowls so each person can dip immediately before eating.
Serve alongside burgers, sandwiches, or grilled chicken. A crisp salad or sliced tomatoes makes a fresh accompaniment. For a snack platter, arrange the fries loosely rather than packing them upright into a deep cup where steam collects.
If cooking in air-fryer batches, consider serving successive small batches. Waiting for every round to finish may leave the first batch soft. A larger oven batch can be more convenient when several people are eating together.
Make-Ahead, Storage, and Freezing
For preparation ahead, mix the dry breadcrumb seasoning and refrigerate the grated Parmesan mixture in a covered container. Cut and dry the zucchini close to breading time for the best surface condition. Breaded strips can become damp as they sit, so cooking promptly is preferable.
Refrigerate cooked leftovers promptly in a shallow container at 40°F or below and use within two days for best quality. Limit time out of refrigeration to two hours, or one hour above 90°F. Keep dips separate and respect their own storage instructions.
Reheat in a 400°F oven or 375°F air fryer in one layer. Begin checking around five to eight minutes in the oven or three to five minutes in the air fryer, but continue until hot throughout, reaching 165°F. Previously cooked zucchini may remain softer than a fresh batch.
The supplied recipe suggests freezing uncooked breaded strips. This is possible, but zucchini can release more water after freezing, so a crisp result is not guaranteed. Freeze promptly in one layer until firm, then package in a freezer-safe container and use within about one month for a practical quality target.
Cook frozen breaded strips directly from frozen rather than thawing, allowing additional time and checking that the egg coating is fully cooked. Handle them as raw egg-coated food until cooked. Discard leftover breading and egg from the preparation station and clean the utensils and surfaces thoroughly.
General leftover handling guidance is available from the USDA Food Safety and Inspection Service.
Frequently Asked Questions
Should I salt the zucchini before breading?
This method does not include a salted draining rest. Salt can draw additional water to the surface, so avoid salting the cut sticks and leaving them unattended. Dry them thoroughly and keep the measured salt in the crumb mixture.
Can I skip the flour?
The flour helps the egg adhere. Skipping it may give a less even coating, particularly on moist zucchini. If you need a flour substitution, use an appropriate alternative and test a few pieces rather than omitting the layer automatically.
Can I use only egg whites?
Egg whites may help crumbs adhere, but the coating and browning can differ. The standard recipe uses two whole eggs with milk. A substitution should be treated as a variation rather than a tested equivalent.
Are these low-carb fries?
The recipe contains flour and panko, so it is not automatically a low-carbohydrate or keto recipe. Zucchini replaces potato as the vegetable, but the coating still contributes carbohydrates.
Are the calories accurate?
Approximately 220 calories per serving is the supplied estimate before dip. Actual calories depend on zucchini size, how much flour and breading adheres, the cheese, and the amount of oil used. Calculate with your own ingredient quantities and leftovers if precise tracking matters.
Quick Recipe Reference
Cut two medium zucchini into quarter-inch sticks and blot dry. Set up flour, eggs whisked with milk, and panko mixed with Parmesan and seasonings. Coat lightly in flour, dip in egg, and press into crumbs. Arrange in one spaced layer, mist with oil, and bake at 425°F for approximately fifteen to twenty minutes, turning carefully halfway through. Alternatively, air-fry small batches at 400°F for approximately eight to twelve minutes, checking early. Rest briefly and serve immediately with dip alongside.
Crispy Shoestring Zucchini Fries
Description
- Prep time: About 20 minutes; allow longer for careful breading
- Oven time: Approximately 15–20 minutes
- Brief rest: About 2 minutes
- Total time: Approximately 40–45 minutes for one oven batch
- Servings: 4 side portions
- Yield: Approximately 4 cups, depending on zucchini size and coating
- Oven temperature: 425°F
- Air-fryer starting point: 400°F for approximately 8–12 minutes per batch
Multiple pans or air-fryer batches increase the total elapsed time. The stated yield is approximate; two medium zucchini are not a standardized weight, and a loose cup of breaded strips varies with how the pieces settle.
Ingredients
For the Zucchini Fries
- 2 medium zucchini
- ½ cup all-purpose flour
- 2 large eggs
- 1 tablespoon milk
- 1 cup panko breadcrumbs
- ½ cup finely grated Parmesan cheese
- ½ teaspoon garlic powder
- ½ teaspoon smoked paprika
- ½ teaspoon Italian seasoning
- ¼ teaspoon freshly ground black pepper
- ¼ teaspoon salt
- Olive oil cooking spray, as needed for a light coating
Optional for Serving
- Ranch dressing
- Warm marinara sauce
- Garlic aioli
- Chopped fresh parsley
- Extra grated Parmesan
The flour, egg, and breadcrumb quantities provide enough material for a workable breading station. You may not use every bit. Discard coating ingredients that have contacted raw egg or egg-coated zucchini instead of saving them for a later recipe.
Instructions
1. Preheat and Prepare the Pan
Preheat the oven to 425°F with a rack near the center. Line a large baking sheet with suitable parchment. If using an oven-safe wire rack, set it securely on the pan and grease it lightly; otherwise lightly grease the lined baking surface.
Have a second pan available if the zucchini will not fit with space between pieces. Crowding one pan to avoid using another usually compromises the coating more than it saves effort.
2. Cut and Dry the Zucchini
Wash, dry, trim, and cut the zucchini into approximately quarter-inch matchsticks. Lay the strips on a clean towel and blot the cut surfaces thoroughly. Turn them over and blot again if visibly damp.
Do not squeeze the sticks as you would grated zucchini for fritters. They need to retain their shape. Drying the surface is the goal, while accepting that the vegetable will still contain moisture inside.
3. Set Up Three Bowls
Place flour in the first shallow bowl. Whisk eggs and milk in the second. In the third, combine panko, Parmesan, garlic powder, smoked paprika, Italian seasoning, black pepper, and salt.
Mix the crumbs well so the seasoning does not stay in one corner. Place the prepared pan beside the final bowl to reduce handling after breading. A dry hand for flour and crumbs and a separate hand for egg can help keep the station cleaner.
4. Dust with Flour
Work with a few zucchini sticks at a time. Turn them through the flour, then lift and shake gently to remove excess. All sides should have a light coating without thick patches.
Avoid placing a large pile in the bowl at once. Sticks can stick together and leave wet surfaces uncoated. A little attention here makes the following layers easier to apply evenly.
5. Dip in Egg
Move the floured sticks into the egg mixture and coat all sides. Lift them out and let excess drip back into the bowl before transferring to the crumbs.
Use tongs if easier, but handle gently so the narrow pieces remain intact. Do not carry a spoonful of egg into the panko; it will clump the breading and leave later pieces less evenly covered.
6. Apply the Panko Coating
Roll the strips through the seasoned crumbs and press lightly to help them adhere. Lift onto the prepared rack or baking sheet. Small bare spots are preferable to a heavy, lumpy coating that falls off during cooking.
If the crumb bowl becomes damp, add a reserved clean portion if available. You can start with part of the mixture in the working bowl and replenish as needed, which keeps more of it dry during breading.
7. Space and Mist
Arrange the strips in one layer with a little space between them. They should not overlap or form a mound. Lightly mist the tops with olive oil cooking spray, following the product instructions.
Aim for a thin, even film rather than soaking the crumbs. If your spray leaves concentrated wet patches, move it more evenly or use a suitable oil mister. Extra oil alone will not prevent crowded zucchini from steaming.
8. Bake and Turn
Bake for approximately fifteen to twenty minutes, turning carefully around halfway through. Begin checking around twelve minutes, especially if some strips are thinner. Use tongs or a spatula and avoid scraping away the coating.
Look for golden crumbs, set breading, and tender zucchini. Because raw egg is used in the coating, it should be fully cooked; 160°F is the target for egg-containing mixtures where a reliable reading is practical. A representative thicker piece is easier to check than a very fine strip.
9. Finish Browning if Necessary
If the zucchini is tender but the surface is slightly pale, continue baking briefly while watching closely. For optional broiling, first transfer to an appropriate broiler-safe metal setup without parchment and confirm that any rack is broiler-safe.
Broil only briefly, watching continuously. Parmesan and crumbs can burn quickly, and the additional handling may not be worthwhile for a small color difference. A golden baked finish is enough.
10. Rest Briefly and Serve
Remove from the oven and let stand for about two minutes. Transfer to a platter in a loose layer and add optional parsley or Parmesan. Serve the dip beside the fries.
Do not cover tightly or pour sauce over the batch. Both trap or add moisture and soften the coating. The fries are best eaten warm soon after this short rest.