Introduction to Strawberry Pop-Tart Pie
As a busy mom, I know how precious time can be, especially when it comes to whipping up something sweet. That’s why I’m excited to share my Strawberry Pop-Tart Pie with you! This delightful dessert combines the nostalgic flavors of strawberry pop-tarts with a flaky pie crust, creating a treat that’s both fun and delicious. Whether you’re looking to impress your loved ones or simply want a quick solution for a busy day, this pie is sure to bring smiles all around. Trust me, it’s a slice of happiness you won’t want to miss!
Why You’ll Love This Strawberry Pop-Tart Pie
This Strawberry Pop-Tart Pie is a game-changer for busy days. It’s incredibly easy to make, taking just 45 minutes from start to finish. The sweet, fruity filling paired with a buttery crust is a flavor explosion that will delight your taste buds. Plus, it’s a fun way to get the kids involved in the kitchen. Who wouldn’t love a dessert that’s both quick and delicious? It’s a win-win!
Ingredients for Strawberry Pop-Tart Pie
Gathering the right ingredients is the first step to creating your Strawberry Pop-Tart Pie. Here’s what you’ll need:
- Pre-made pie crust: This saves time and effort. You can find it in the refrigerated section of your grocery store. If you’re feeling adventurous, homemade crust is a great option too!
- Strawberry jam: This is the heart of your pie, providing that sweet, fruity flavor. Choose a high-quality jam for the best taste. You can also use homemade jam if you have some on hand.
- Fresh strawberries: Sliced strawberries add a burst of freshness and texture. Look for ripe, juicy strawberries for maximum flavor. You can also substitute with other berries if you prefer.
- Powdered sugar: This will be used for the drizzle, giving it that sweet touch. It dissolves easily, making it perfect for glazes.
- Milk: Just a splash is needed to thin out the drizzle. Any type of milk works, including dairy or plant-based options.
- Vanilla extract: A little bit of vanilla enhances the overall flavor, making it even more delightful. Use pure vanilla extract for the best results.
- Egg (for egg wash): This is brushed on top of the pie to give it a beautiful golden color. If you prefer a vegan option, you can use a plant-based milk instead.
For exact measurements, check the bottom of the article where you can find everything listed for printing. Happy baking!
How to Make Strawberry Pop-Tart Pie
Now that you have your ingredients ready, let’s dive into making this delightful Strawberry Pop-Tart Pie! Follow these simple steps, and you’ll have a delicious dessert that’s sure to impress.
Step 1: Preheat the Oven
First things first, preheat your oven to 375°F (190°C). Preheating is crucial because it ensures that your pie bakes evenly. A hot oven helps the crust become golden and flaky, while the filling bubbles up beautifully. Trust me, you don’t want to skip this step!
Step 2: Prepare the Pie Crust
Next, roll out your pre-made pie crust on a lightly floured surface. Aim for a circle that’s about 12 inches in diameter. Gently place the rolled crust into your pie dish, pressing it down to fit snugly. Don’t worry if it tears a little; you can patch it up with your fingers. This crust is the foundation of your Strawberry Pop-Tart Pie!
Step 3: Spread the Strawberry Jam
Now, grab that strawberry jam and spread it evenly over the crust. Use a spatula for a smooth application. Make sure to cover the entire surface, leaving a small border around the edges. This jam is the heart of your pie, so don’t be shy—layer it on generously for the best flavor!
Step 4: Add Fresh Strawberries
Time to add those fresh strawberries! Slice them into thin pieces, about a quarter-inch thick. This allows them to cook evenly and blend beautifully with the jam. Fresh strawberries bring a burst of flavor and a lovely texture to your pie. If you can, use ripe, juicy ones for maximum sweetness!
Step 5: Cover and Seal
Take another layer of pie crust and carefully place it over the strawberries. Gently press down the edges to seal them together. You can crimp the edges with a fork or your fingers for a decorative touch. Sealing is important to keep all that delicious filling inside while it bakes!
Step 6: Brush with Egg Wash
Now, let’s make that pie shine! Brush the top crust with the beaten egg. This egg wash gives your pie a beautiful golden finish and a lovely sheen. If you’re looking for a vegan option, a splash of plant-based milk works just as well!
Step 7: Bake the Pie
Pop your pie into the preheated oven and bake for 25-30 minutes. Keep an eye on it! You want the crust to turn a lovely golden brown. To check for doneness, look for bubbling around the edges and a nice color on top. Your kitchen will smell heavenly during this time!
Step 8: Cool and Drizzle
Once baked, remove the pie from the oven and let it cool for about 15 minutes. This cooling time is essential; it allows the filling to set. While it cools, prepare your drizzle by mixing powdered sugar, milk, and vanilla extract until smooth. Once the pie is cool, drizzle this sweet mixture over the top. It’s the perfect finishing touch!
Tips for Success
- Use room temperature ingredients for a smoother dough and better mixing.
- Don’t rush the cooling process; it helps the filling set properly.
- Experiment with different jams or fruits for unique flavor combinations.
- For a fun twist, sprinkle some cinnamon on the crust before baking.
- Keep an eye on the pie while baking to prevent over-browning.
Equipment Needed
- Pie dish: A standard 9-inch pie dish works perfectly. If you don’t have one, a round baking pan can be a good substitute.
- Rolling pin: Essential for rolling out the crust. A wine bottle can work in a pinch!
- Spatula: Great for spreading jam evenly. A butter knife can also do the trick.
- Mixing bowl: Needed for preparing the drizzle. Any bowl will suffice.
Variations
- Berry Medley: Swap out strawberries for a mix of berries like blueberries, raspberries, or blackberries for a colorful twist.
- Chocolate Drizzle: Add a chocolate drizzle instead of the vanilla glaze for a decadent touch that chocolate lovers will adore.
- Gluten-Free Option: Use a gluten-free pie crust to make this dessert suitable for those with gluten sensitivities.
- Nutty Crunch: Incorporate crushed nuts like almonds or pecans into the filling for added texture and flavor.
- Spiced Up: Add a pinch of cinnamon or nutmeg to the strawberry jam for a warm, spiced flavor that’s perfect for fall.
Serving Suggestions
- Pair your Strawberry Pop-Tart Pie with a scoop of vanilla ice cream for a delightful contrast.
- Serve with a dollop of whipped cream and fresh mint leaves for a pop of color.
- Enjoy with a cup of hot tea or coffee to balance the sweetness.
- For a fun presentation, slice the pie into triangles and serve on colorful plates.
FAQs about Strawberry Pop-Tart Pie
Can I use frozen strawberries for this pie?
Absolutely! Frozen strawberries can work in a pinch. Just make sure to thaw and drain them well to avoid excess moisture in your pie.
How do I store leftovers?
Store any leftover Strawberry Pop-Tart Pie in the refrigerator for up to three days. Just cover it with plastic wrap or foil to keep it fresh!
Can I make this pie ahead of time?
Yes! You can prepare the pie a day in advance. Just bake it, let it cool, and store it in the fridge. Drizzle the glaze just before serving for the best presentation.
What can I substitute for the egg wash?
If you prefer a vegan option, you can brush the crust with a bit of plant-based milk or a mixture of water and maple syrup for a nice shine.
Can I use a different type of jam?
Definitely! Feel free to experiment with other flavors like raspberry or apricot jam. Each will give your Strawberry Pop-Tart Pie a unique twist!
Final Thoughts
Creating this Strawberry Pop-Tart Pie is more than just baking; it’s about making memories. The joy of seeing your loved ones’ faces light up as they take that first bite is priceless. This pie is a delightful blend of nostalgia and creativity, perfect for any occasion. Whether it’s a family gathering or a simple weeknight treat, it brings everyone together. Plus, it’s a fantastic way to get the kids involved in the kitchen. So, roll up your sleeves, embrace the mess, and enjoy the sweet rewards of your culinary adventure. Happy baking!
Print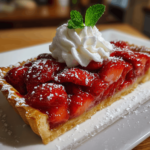
Strawberry Pop-Tart Pie: A Delicious Twist on Dessert
- Total Time: 45 minutes
- Yield: 8 servings 1x
- Diet: Vegetarian
Description
A delightful dessert that combines the flavors of strawberry pop-tarts with a pie crust for a unique treat.
Ingredients
- 1 pre-made pie crust
- 1 cup strawberry jam
- 1 cup fresh strawberries, sliced
- 1 cup powdered sugar
- 2 tablespoons milk
- 1 teaspoon vanilla extract
- 1 egg, beaten (for egg wash)
Instructions
- Preheat the oven to 375°F (190°C).
- Roll out the pie crust and place it in a pie dish.
- Spread the strawberry jam evenly over the crust.
- Add the sliced strawberries on top of the jam.
- Cover with another layer of pie crust and seal the edges.
- Brush the top with the beaten egg.
- Bake for 25-30 minutes or until golden brown.
- Let it cool before drizzling with a mixture of powdered sugar, milk, and vanilla extract.
Notes
- For a more intense strawberry flavor, add more fresh strawberries.
- Serve with whipped cream or ice cream for added indulgence.
- Store leftovers in the refrigerator for up to 3 days.
- Prep Time: 15 minutes
- Cook Time: 30 minutes
- Category: Dessert
- Method: Baking
- Cuisine: American
Nutrition
- Serving Size: 1 slice
- Calories: 250
- Sugar: 15g
- Sodium: 150mg
- Fat: 10g
- Saturated Fat: 3g
- Unsaturated Fat: 5g
- Trans Fat: 0g
- Carbohydrates: 35g
- Fiber: 2g
- Protein: 3g
- Cholesterol: 30mg
Keywords: Strawberry Pop-Tart Pie, dessert, pie, strawberries