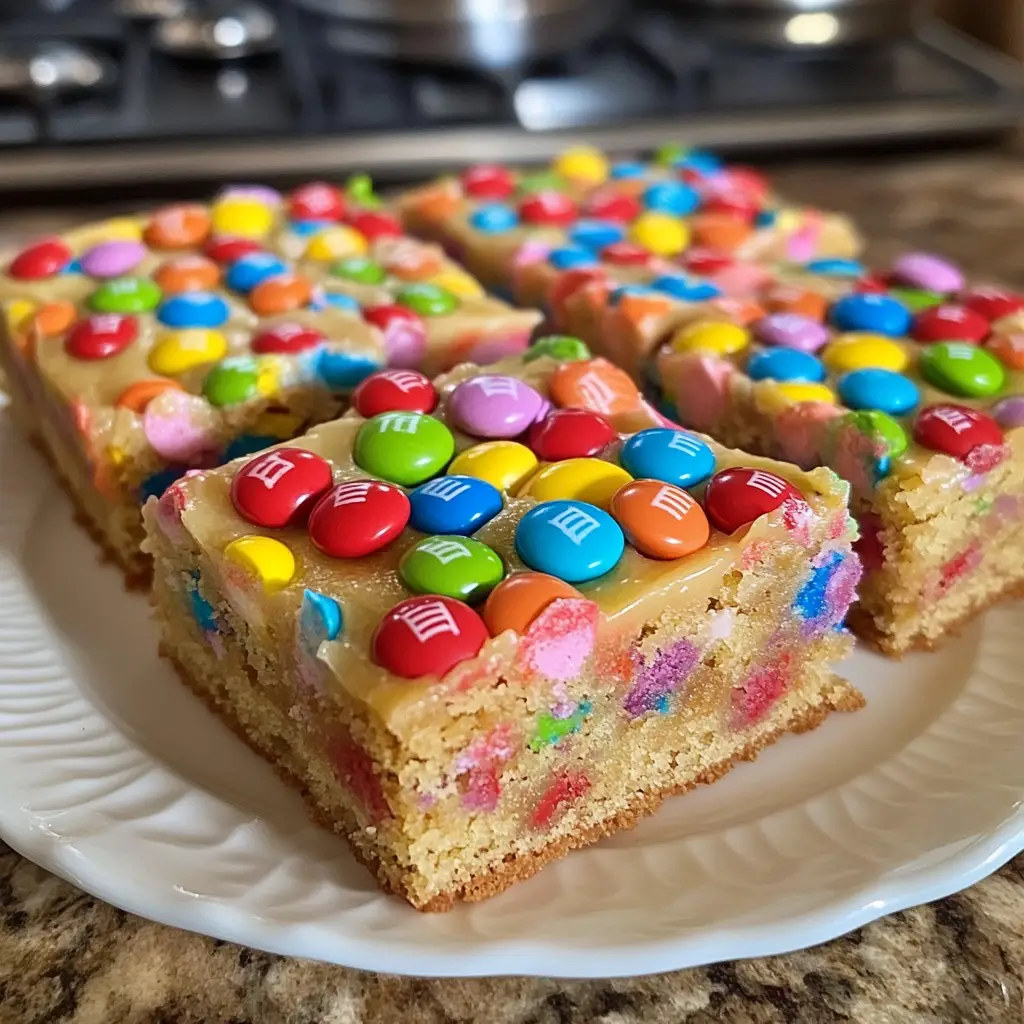
Introduction to Spring M&M Cake Bars Recipe
As the flowers bloom and the sun shines brighter, I find myself drawn to the kitchen, eager to whip up something sweet and colorful. There’s just something magical about spring that inspires creativity in my baking. One of my all-time favorite treats to make during this season is the Spring M&M Cake Bars. These delightful bars are not only a feast for the eyes but also a burst of flavor that brings joy to every bite.
Let me take you back to a sunny afternoon last spring. I was hosting a small gathering for friends, and I wanted to create a dessert that would capture the essence of the season. I rummaged through my pantry and stumbled upon a bag of vibrant M&Ms. Instantly, an idea sparked in my mind! Why not combine them with a soft, cake-like base? The result was a hit! Everyone loved the chewy texture and the colorful pops of chocolate. It was a moment of pure bliss, and I knew I had to share this recipe with you.
These Spring M&M Cake Bars are perfect for any occasion, whether it’s a picnic, a birthday party, or just a cozy afternoon at home. They are easy to make, and the best part? You can customize them with your favorite M&M colors or even add a sprinkle of nuts for an extra crunch. So, roll up your sleeves, and let’s dive into this delightful recipe that will surely brighten your spring days!
Ingredients for Spring M&M Cake Bars Recipe
Before we dive into the baking process, let’s gather all the ingredients we need for these delightful Spring M&M Cake Bars. I always believe that using quality ingredients makes a world of difference in the final product. So, let’s make sure we have everything ready!
Main Ingredients
- 1 cup (2 sticks) unsalted butter, softened
- 1 cup granulated sugar
- 1 cup packed brown sugar
- 4 large eggs
- 2 teaspoons vanilla extract
- 3 cups all-purpose flour
- 1 teaspoon baking powder
- 1 teaspoon baking soda
- ½ teaspoon salt
- 1 ½ cups Spring-themed M&Ms (or your favorite colors)
When it comes to butter, I always opt for unsalted. This way, I can control the saltiness of my bars. And trust me, the combination of granulated and brown sugar gives these bars a lovely depth of flavor. The brown sugar adds a hint of caramel that pairs beautifully with the chocolatey M&Ms.
Optional Add-ons
- ½ cup chopped nuts (like walnuts or pecans)
- 1 cup shredded coconut
- ½ cup mini chocolate chips
- Sprinkles for extra color
Feel free to get creative! I sometimes toss in a handful of chopped nuts for a delightful crunch or sprinkle some coconut for a tropical twist. The mini chocolate chips can add an extra layer of chocolatey goodness, making these bars even more irresistible. Just remember, the more colorful, the better—after all, we’re celebrating spring!
How to Prepare Spring M&M Cake Bars Recipe
Now that we have all our ingredients ready, it’s time to roll up our sleeves and get baking! I love the process of creating something delicious from scratch. Each step is like a little adventure, and I can’t wait to share it with you. Let’s dive into the steps to make these delightful Spring M&M Cake Bars!
Step 1: Preheat the Oven and Prepare the Baking Dish
First things first, let’s preheat that oven to 350°F (175°C). This ensures that our cake bars bake evenly and come out perfectly fluffy. While the oven warms up, grab a 9×13-inch baking dish and grease it with a bit of butter or cooking spray. You can also line it with parchment paper for easy removal later.
Tips for Step 1
- Make sure your oven is fully preheated before putting in the batter. This helps the bars rise beautifully.
- If you’re using parchment paper, leave some overhang on the sides. This makes it super easy to lift the bars out once they’re baked!
Step 2: Mix the Dry Ingredients
In a large bowl, whisk together the flour, baking powder, baking soda, and salt. This step is crucial because it helps to evenly distribute the leavening agents throughout the flour. I always find that a good whisking can make a world of difference!
Tips for Step 2
- Use a sifter if you have one! It helps to aerate the flour and makes for a lighter texture.
- Don’t skip the salt! It enhances the flavors and balances the sweetness of the sugars.
Step 3: Cream the Butter and Sugar
In another bowl, it’s time to cream the softened butter, granulated sugar, and brown sugar together. I usually use an electric mixer for this step, but a good old-fashioned whisk works too! Beat them until the mixture is light and fluffy, which usually takes about 3-5 minutes.
Tips for Step 3
- Make sure your butter is at room temperature. This helps it blend smoothly with the sugars.
- Don’t rush this step! Creaming properly adds air to the mixture, making your bars light and airy.
Step 4: Combine Wet and Dry Ingredients
Now, it’s time to add the eggs and vanilla extract to the butter-sugar mixture. Beat until well combined. Then, gradually add the dry ingredients to the wet mixture. I like to do this in three parts, mixing gently until just combined. Overmixing can lead to dense bars, and we want them to be soft and chewy!
Tips for Step 4
- Scrape down the sides of the bowl to ensure everything is mixed evenly.
- Mix until you see no more flour streaks, but don’t worry if the batter is a little lumpy!
Step 5: Fold in M&Ms and Pour into Baking Dish
Here comes the fun part! Gently fold in the Spring-themed M&Ms. I love watching the colors swirl into the batter. Once they’re evenly distributed, pour the mixture into the prepared baking dish. Spread it out evenly with a spatula.
Tips for Step 5
- Save a handful of M&Ms to sprinkle on top before baking. It makes for a beautiful presentation!
- Be gentle when folding in the M&Ms to avoid breaking them.
Step 6: Bake and Cool
Pop the baking dish into the preheated oven and bake for about 25-30 minutes. You’ll know they’re done when the edges are golden brown and a toothpick inserted in the center comes out clean. Once baked, let them cool in the pan for about 10 minutes before transferring them to a wire rack to cool completely.
Tips for Step 6
- Keep an eye on the bars as they bake. Ovens can vary, and you don’t want them to overbake!
- Letting them cool completely helps them set up nicely, making them easier to cut into bars.
Equipment Needed for Spring M&M Cake Bars Recipe
Before we get our hands dirty with the batter, let’s make sure we have all the right tools at our disposal. Having the right equipment can make the baking process smoother and more enjoyable. Here’s what you’ll need to whip up these delightful Spring M&M Cake Bars:
- 9×13-inch baking dish: This is the perfect size for our cake bars. If you don’t have one, a similar-sized dish will work, but keep an eye on the baking time.
- Mixing bowls: I recommend having at least two—one for the dry ingredients and one for the wet. It keeps things organized and makes mixing easier.
- Electric mixer or whisk: An electric mixer speeds up the creaming process, but a whisk can do the job just as well if you’re feeling a bit more hands-on.
- Rubber spatula: This is essential for folding in the M&Ms and scraping down the sides of the bowl. It helps ensure everything is well combined.
- Measuring cups and spoons: Accurate measurements are key to baking success, so don’t skip these!
- Parchment paper (optional): If you want to make removing the bars from the pan a breeze, lining the dish with parchment paper is a great idea.
With these tools in hand, you’re all set to embark on your baking adventure! Remember, the kitchen is a place for creativity, so feel free to improvise if you don’t have something on this list. Happy baking!
Variations of Spring M&M Cake Bars Recipe
One of the things I adore about baking is the endless possibilities for creativity. These Spring M&M Cake Bars are no exception! While the classic recipe is delightful on its own, I love to experiment with different flavors and textures. Here are a few fun variations you can try:
- Chocolate Swirl: For a rich twist, add a swirl of chocolate fudge or brownie batter on top before baking. It creates a delicious contrast with the cake base.
- Fruit Infusion: Toss in some chopped strawberries or raspberries for a fruity burst. The tartness of the berries pairs beautifully with the sweetness of the M&Ms.
- Peanut Butter Delight: Mix in a half cup of creamy peanut butter into the batter for a nutty flavor that complements the chocolate M&Ms perfectly.
- Oreo Crunch: Crush some Oreo cookies and fold them into the batter. The chocolatey crunch adds a delightful texture and flavor.
- Seasonal Sprinkles: Change up the M&M colors based on the season! Use pastel colors for spring, red and green for Christmas, or even Halloween-themed colors for a spooky treat.
These variations not only keep things exciting but also allow you to tailor the bars to your taste or the occasion. So, don’t hesitate to get creative and make these Spring M&M Cake Bars your own!
Cooking Notes for Spring M&M Cake Bars Recipe
As I’ve learned through my baking adventures, a few cooking notes can make all the difference in achieving the perfect Spring M&M Cake Bars. Here are some tips that I always keep in mind when whipping up this delightful treat:
- Room Temperature Ingredients: Make sure your butter and eggs are at room temperature before you start. This helps them blend together smoothly, creating a better texture in your bars.
- Don’t Overmix: When combining the wet and dry ingredients, mix just until everything is combined. Overmixing can lead to tough bars, and we want them to be soft and chewy!
- Cooling Time: Allow the bars to cool completely before cutting them. This helps them set up nicely and makes for cleaner cuts. Trust me, the wait is worth it!
- Storage: Store any leftovers in an airtight container at room temperature for up to a week. If you want to keep them fresh longer, you can freeze them for up to three months. Just make sure to wrap them well!
- Experiment with Flavors: Don’t hesitate to play around with different flavors and add-ins. Whether it’s a splash of almond extract or a handful of dried fruit, the possibilities are endless!
These little notes have helped me create the best Spring M&M Cake Bars, and I hope they do the same for you. Happy baking, and enjoy every delicious bite!
Serving Suggestions for Spring M&M Cake Bars Recipe
When it comes to serving my Spring M&M Cake Bars, I love to get a little creative! These bars are not just a treat; they can also be a centerpiece for any gathering. Here are some delightful serving suggestions that I’ve found to elevate the experience:
- With a Scoop of Ice Cream: Serve warm bars with a scoop of vanilla or mint chocolate chip ice cream on top. The melting ice cream creates a delicious contrast with the chewy bars.
- Drizzled with Chocolate: A simple drizzle of melted chocolate or caramel sauce over the bars adds an extra layer of sweetness and makes them look fancy!
- On a Colorful Platter: Arrange the bars on a vibrant platter, garnished with fresh berries or edible flowers. It’s a beautiful way to showcase the colors of spring!
- As Party Favors: Cut the bars into smaller squares and package them in clear bags tied with a ribbon. They make perfect party favors for birthdays or spring celebrations.
- With a Cup of Tea or Coffee: Enjoy these bars with a warm cup of tea or coffee. The flavors complement each other beautifully, making for a cozy afternoon treat.
These serving ideas not only enhance the presentation but also make the experience of enjoying these Spring M&M Cake Bars even more delightful. So, whether it’s a casual family gathering or a festive celebration, these bars are sure to impress!
Tips for Making the Best Spring M&M Cake Bars Recipe
As a passionate home cook, I’ve learned a few tricks along the way that can take your Spring M&M Cake Bars from good to absolutely amazing! Here are my top tips to ensure your baking adventure is a sweet success:
- Measure Accurately: Baking is a science, so precise measurements are key. Use measuring cups and spoons for accuracy, and level off your ingredients for the best results.
- Use Fresh Ingredients: Check the expiration dates on your baking powder and baking soda. Fresh leavening agents make a big difference in how well your bars rise!
- Don’t Skip the Cooling: Allow your bars to cool completely in the pan before cutting. This helps them set and makes for cleaner, prettier slices.
- Customize Your M&Ms: Feel free to mix and match M&M colors or even use different flavors. The variety adds a fun twist and makes each bite exciting!
- Keep an Eye on Baking Time: Ovens can vary, so start checking your bars a few minutes before the recommended baking time. You want them golden brown but not overbaked!
With these tips in your back pocket, you’re all set to create the most delightful Spring M&M Cake Bars. Happy baking, and may your kitchen be filled with sweet aromas and joyful moments!
Breakdown of Time for Spring M&M Cake Bars Recipe
As a home cook, I know that time management is key to a successful baking experience. Knowing how long each step takes helps me plan my kitchen adventures better. Here’s a quick breakdown of the time you’ll need for the Spring M&M Cake Bars:
- Prep Time: 15 minutes
- Cooking Time: 25-30 minutes
- Total Time: 40-45 minutes
During the prep time, you’ll gather your ingredients, mix the batter, and get everything ready for baking. The cooking time is when the magic happens in the oven, filling your kitchen with delightful aromas. Once they’re baked, don’t forget to allow a little cooling time before diving in! This way, you’ll have perfectly set bars that are easy to cut and serve. Happy baking!
Nutritional Information for Spring M&M Cake Bars Recipe
As a passionate home cook, I always find it helpful to know the nutritional content of the treats I bake. It allows me to enjoy them mindfully while sharing them with friends and family. Here’s a general breakdown of the nutritional information for one serving of Spring M&M Cake Bars, assuming you cut the batch into 24 bars:
- Calories: Approximately 200
- Fat: 9g
- Saturated Fat: 5g
- Cholesterol: 40mg
- Sodium: 150mg
- Carbohydrates: 30g
- Fiber: 1g
- Sugars: 15g
- Protein: 2g
Keep in mind that these values can vary based on the specific ingredients you use and any optional add-ons you choose to include. If you’re looking to make these bars a bit healthier, consider using whole wheat flour or reducing the sugar slightly. Regardless, they’re a delightful treat that brings a smile to everyone’s face!
Frequently Asked Questions about Spring M&M Cake Bars Recipe
As I’ve shared my Spring M&M Cake Bars recipe with friends and family, I’ve noticed a few common questions pop up. It’s always great to clarify any doubts, especially when it comes to baking. So, let’s dive into some frequently asked questions to help you on your baking journey!
Can I use different types of M&Ms?
Absolutely! One of the best things about this recipe is its versatility. You can use any type of M&Ms you like—peanut, almond, or even the seasonal flavors. Each type brings its own unique twist to the bars, so feel free to experiment!
How should I store the leftover cake bars?
To keep your Spring M&M Cake Bars fresh, store them in an airtight container at room temperature for up to a week. If you want to keep them longer, you can freeze them for up to three months. Just make sure to wrap them well to prevent freezer burn!
Can I make these bars gluten-free?
Yes, you can! Simply substitute the all-purpose flour with a gluten-free flour blend. I recommend using a blend that includes xanthan gum for the best texture. Just keep an eye on the baking time, as gluten-free flours can behave differently.
What if I don’t have a 9×13-inch baking dish?
No worries! If you don’t have a 9×13-inch dish, you can use a similar-sized pan. Just remember that the baking time may vary slightly, so keep an eye on your bars as they bake. You can also use two smaller pans if that’s what you have on hand.
Can I add more mix-ins to the batter?
Definitely! This recipe is all about creativity. You can add nuts, chocolate chips, or even dried fruits to the batter. Just be mindful of the total volume so that the bars still bake evenly. The more colorful and varied, the better!
These questions are just a few of the common inquiries I’ve encountered while baking these delightful Spring M&M Cake Bars. If you have any other questions or need further clarification, feel free to reach out! Happy baking, and may your kitchen be filled with sweet aromas and joyful moments!
Conclusion on Spring M&M Cake Bars Recipe
As I wrap up this delightful journey of baking Spring M&M Cake Bars, I can’t help but feel a sense of joy and satisfaction. These bars are more than just a sweet treat; they embody the spirit of spring with their vibrant colors and cheerful flavors. They are incredibly easy to make, making them perfect for both novice bakers and seasoned pros alike.
What I love most about this recipe is its versatility. You can customize it to suit any occasion or personal taste, whether you want to add nuts, swap out M&M flavors, or even incorporate seasonal fruits. Each bite is a celebration of spring, bringing smiles to faces young and old.
So, whether you’re hosting a gathering, enjoying a cozy afternoon at home, or simply looking to brighten someone’s day, these Spring M&M Cake Bars are sure to do the trick. I hope you find as much joy in baking and sharing them as I do. Happy baking, and may your kitchen always be filled with love and laughter!