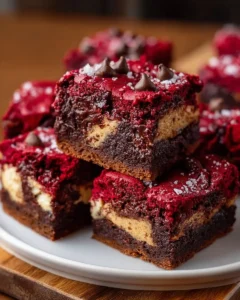
Introduction to Raspberry Lemon Bars Recipe
Ah, raspberry lemon bars! Just the thought of them brings a smile to my face. I remember the first time I tasted these delightful treats at a summer picnic. The sun was shining, and the air was filled with laughter. As I took a bite, the sweet-tart flavor danced on my tongue, and I was instantly hooked. It was like a burst of sunshine wrapped in a buttery crust!
Since that day, I’ve made it my mission to perfect my own Raspberry Lemon Bars Recipe. Each time I whip up a batch, I’m reminded of those carefree summer days. The vibrant colors of the raspberries and the bright yellow of the lemon filling create a visual feast that’s just as delightful as the taste. Plus, they’re surprisingly easy to make, which is a win-win in my book!
What I love most about these bars is their versatility. They can be served at a fancy dinner party or enjoyed as a simple afternoon snack. I often find myself sharing them with friends and family, and they never fail to impress. The combination of zesty lemon and juicy raspberries is a match made in heaven, and I can’t wait to share my recipe with you!
So, grab your apron and let’s dive into the world of raspberry lemon bars. I promise you’ll be creating sweet memories in your kitchen, just like I did. Let’s get started on this delicious adventure!
Ingredients for Raspberry Lemon Bars Recipe
Before we embark on our culinary journey, let’s gather all the ingredients we need for these scrumptious raspberry lemon bars. I always believe that quality ingredients make a world of difference in the final product. So, let’s make sure we have everything ready to go!
Main Ingredients
- 1 cup (125g) all-purpose flour: This forms the base of our crust. I prefer using unbleached flour for a more natural flavor.
- 1/2 cup (115g) unsalted butter: Make sure it’s softened to room temperature. This adds richness to the crust.
- 1/4 cup (50g) granulated sugar: This sweetens the crust just enough to balance the tartness of the filling.
- 1/4 teaspoon salt: A pinch of salt enhances all the flavors beautifully.
- 2 large eggs: These are essential for the lemon filling, giving it that lovely custard-like texture.
- 1 cup (240ml) fresh lemon juice: Freshly squeezed is best! It brings a bright, zesty flavor that’s hard to beat.
- 1 cup (120g) granulated sugar (for the filling): This balances the tartness of the lemons and the raspberries.
- 1 cup (150g) fresh raspberries: You can use frozen raspberries if fresh ones aren’t available. Just make sure to thaw and drain them first!
- Zest of 1 lemon: This adds an extra punch of lemon flavor that I absolutely adore.
Optional Add-ons
- Powdered sugar: For dusting on top before serving. It adds a lovely touch and makes the bars look extra special.
- Whipped cream: A dollop of whipped cream on the side can elevate your dessert experience.
- Mint leaves: For garnish, they add a pop of color and a refreshing flavor.
- Almond extract: A teaspoon can be added to the filling for a unique twist.
Now that we have our ingredients lined up, it’s time to get our hands a little messy and start creating these delightful raspberry lemon bars. Trust me, the end result will be worth every moment spent in the kitchen!
How to Prepare Raspberry Lemon Bars Recipe
Now that we have our ingredients ready, it’s time to roll up our sleeves and dive into the fun part—preparing our raspberry lemon bars! I find that following each step carefully makes all the difference. So, let’s get started!
Step 1: Prepare the Crust
First things first, we need to create a buttery, crumbly crust that will hold all that delicious filling. In a mixing bowl, combine the flour, softened butter, sugar, and salt. Use a fork or your fingers to mix until it resembles coarse crumbs. Then, press this mixture firmly into the bottom of a greased baking dish.
Tips for Achieving the Perfect Crust
- Make sure your butter is at room temperature. This helps it blend smoothly with the dry ingredients.
- Don’t skip the pressing step! A well-pressed crust will hold together better after baking.
- For an extra touch, you can add a sprinkle of lemon zest to the crust mixture for a hint of flavor.
Step 2: Make the Lemon Filling
Next up is the lemon filling! In a separate bowl, whisk together the eggs, granulated sugar, lemon juice, and lemon zest until well combined. This mixture should be smooth and creamy, like sunshine in a bowl!
Tips for Zesting and Juicing Lemons
- Use a microplane for zesting. It gives you fine zest without the bitter white pith.
- Roll the lemons on the counter before juicing. This helps release more juice!
- Always taste your lemon juice before adding sugar. Some lemons are sweeter than others!
Step 3: Add the Raspberry Layer
Now, let’s add the star of the show—raspberries! Gently fold the fresh raspberries into the lemon filling. Be careful not to crush them too much; we want those beautiful bursts of flavor in every bite!
Tips for Layering the Raspberries
- Try to use fresh raspberries for the best flavor. If using frozen, make sure they are thawed and drained.
- For a fun twist, you can mash a few raspberries and swirl them into the filling for a marbled effect.
- Distribute the raspberries evenly to ensure every bar has a taste of that juicy goodness!
Step 4: Bake the Bars
It’s time to bake! Pour the lemon-raspberry mixture over the crust and spread it evenly. Bake in a preheated oven at 350°F (175°C) for about 25-30 minutes, or until the filling is set and the edges are lightly golden.
Tips for Baking Time and Temperature
- Keep an eye on the bars as they bake. Ovens can vary, so check for doneness a few minutes early.
- Don’t overbake! The filling should be slightly jiggly in the center when you take it out.
- Let the bars cool in the pan for a few minutes before transferring them to a wire rack.
Step 5: Cool and Cut
Once baked, allow the bars to cool completely in the pan. This is crucial for achieving clean cuts. After they’ve cooled, dust the top with powdered sugar if you like, and then cut them into squares or rectangles.
Tips for Cutting Clean Bars
- Use a sharp knife for cutting. Wipe the knife with a damp cloth between cuts for cleaner edges.
- Chill the bars in the fridge for an hour before cutting. This helps them firm up even more!
- For a fun presentation, garnish with fresh raspberries or mint leaves before serving.
And there you have it! Your very own batch of raspberry lemon bars, ready to be devoured. I can already imagine the smiles on everyone’s faces as they take that first bite. Enjoy the process, and happy baking!
Equipment Needed for Raspberry Lemon Bars Recipe
Before we dive into the baking process, let’s make sure we have all the right tools at our fingertips. Having the right equipment can make your cooking experience smoother and more enjoyable. Here’s what you’ll need for my Raspberry Lemon Bars Recipe:
- Mixing Bowls: A couple of medium-sized mixing bowls will do the trick. I love using glass bowls because I can see the ingredients mixing together!
- Measuring Cups and Spoons: Accurate measurements are key to baking success. I always keep a set of dry and liquid measuring cups handy.
- Whisk: A good whisk is essential for blending the lemon filling smoothly. If you don’t have one, a fork can work in a pinch!
- Baking Dish: A 9×9-inch square baking dish is perfect for this recipe. If you don’t have one, a similar-sized dish will work just fine.
- Rubber Spatula: This is great for folding in the raspberries and scraping down the sides of the bowls. It’s like having a trusty sidekick in the kitchen!
- Wire Rack: A wire rack is ideal for cooling the bars evenly. If you don’t have one, you can simply cool them in the pan.
- Sharp Knife: For cutting the bars into neat squares. A serrated knife works wonders for this task!
With these tools in hand, you’ll be well-equipped to create your delicious raspberry lemon bars. Remember, the joy of cooking comes not just from the end result, but from the process itself. So, let’s get baking!
Variations of Raspberry Lemon Bars Recipe
As a passionate home cook, I love experimenting with recipes to cater to different dietary needs and preferences. The beauty of my Raspberry Lemon Bars Recipe is its versatility! Here are a couple of variations that I’ve tried and absolutely adore.
Gluten-Free Option
If you or someone you know is gluten-sensitive, fear not! You can easily make these bars gluten-free. Simply swap out the all-purpose flour for a gluten-free flour blend. I recommend using a blend that contains xanthan gum, as it helps mimic the texture of regular flour. The result? Just as delicious and satisfying, with that same buttery crust and zesty filling!
Vegan Alternative
For my vegan friends, I’ve got you covered too! To make these raspberry lemon bars plant-based, replace the eggs with flax eggs. To create a flax egg, mix one tablespoon of ground flaxseed with three tablespoons of water and let it sit for about five minutes until it thickens. Additionally, use a dairy-free butter substitute in place of the unsalted butter. You’ll still enjoy that delightful tartness and sweetness, all while keeping it cruelty-free!
These variations allow everyone to enjoy the delightful flavors of raspberry lemon bars, no matter their dietary restrictions. I love how food can bring people together, and these adaptations ensure that no one misses out on this delicious treat!
Cooking Notes for Raspberry Lemon Bars Recipe
As I’ve journeyed through the world of baking, I’ve learned a few essential cooking notes that can elevate your Raspberry Lemon Bars Recipe experience. These little tips can make a big difference in the outcome of your bars, so let’s dive in!
First, always use fresh ingredients. Fresh lemons and raspberries not only enhance the flavor but also add a vibrant color to your bars. I can’t stress enough how much a fresh squeeze of lemon juice brightens the filling!
Next, be mindful of the baking time. Every oven is different, and I’ve had my fair share of overbaked or underbaked treats. Keep an eye on your bars as they bake. The edges should be lightly golden, and the center should have a slight jiggle when you take them out. This ensures a perfectly set filling!
Lastly, patience is key when it comes to cooling. Allow the bars to cool completely in the pan before cutting. This helps them firm up and makes for cleaner cuts. Trust me, waiting is worth it when you see those beautiful squares come to life!
With these cooking notes in mind, you’ll be well on your way to creating raspberry lemon bars that are not only delicious but also visually stunning. Happy baking!
Serving Suggestions for Raspberry Lemon Bars Recipe
Now that your raspberry lemon bars are beautifully baked and cut, it’s time to think about how to serve them! Presentation can elevate your dessert from delightful to dazzling. Here are some of my favorite serving suggestions that will make your bars shine even brighter.
- Dust with Powdered Sugar: A light dusting of powdered sugar on top adds a touch of elegance. It’s like a sprinkle of fairy dust that makes everything look more inviting!
- Pair with Whipped Cream: A dollop of freshly whipped cream on the side creates a creamy contrast to the tartness of the bars. It’s a match made in dessert heaven!
- Fresh Berries: Serve with a handful of fresh raspberries or even some sliced strawberries. The vibrant colors and juicy bites enhance the overall experience.
- Mint Garnish: A few fresh mint leaves not only add a pop of color but also a refreshing aroma. It’s like a breath of fresh air with every bite!
- Serve Chilled: For a refreshing treat on a hot day, chill the bars in the refrigerator before serving. The coolness complements the zesty lemon flavor perfectly.
These serving suggestions will not only make your raspberry lemon bars look stunning but also enhance the flavors and textures. I love how a little creativity can turn a simple dessert into a showstopper. Enjoy sharing these delightful treats with friends and family, and watch as they disappear in no time!
Tips for Perfecting Raspberry Lemon Bars Recipe
As I’ve baked my fair share of raspberry lemon bars, I’ve gathered a treasure trove of tips that can help you achieve perfection in every bite. These little nuggets of wisdom can make a world of difference, so let’s dive right in!
- Use Room Temperature Ingredients: Make sure your butter and eggs are at room temperature. This helps them blend together smoothly, creating a creamy filling that’s simply irresistible.
- Don’t Skip the Zest: The zest of the lemon adds a burst of flavor that elevates the entire dessert. I always zest my lemons before juicing them to capture all that aromatic goodness!
- Be Gentle with the Raspberries: When folding in the raspberries, be gentle! You want to keep those beautiful berries intact for that delightful burst of flavor in each bar.
- Cool Completely Before Cutting: Patience is key! Allow the bars to cool completely in the pan before cutting. This ensures clean edges and prevents the filling from oozing out.
- Experiment with Flavors: Don’t be afraid to get creative! Try adding a splash of vanilla extract or a hint of almond extract to the filling for a unique twist.
With these tips in your back pocket, you’ll be well on your way to creating raspberry lemon bars that are not only delicious but also visually stunning. Remember, baking is as much about the journey as it is about the destination. Enjoy every moment in the kitchen, and happy baking!
Breakdown of Time for Raspberry Lemon Bars Recipe
Now that we’ve covered the delicious details of making raspberry lemon bars, let’s talk about the time it takes to whip up this delightful treat. I find that knowing the time breakdown helps me plan my baking sessions better. Here’s how it all adds up:
- Prep Time: Approximately 15-20 minutes. This includes gathering your ingredients, preparing the crust, and mixing the lemon filling.
- Cooking Time: About 25-30 minutes. This is the time spent baking the bars to perfection in the oven.
- Total Time: Roughly 45-50 minutes. This is the combined time for prep and cooking, not including cooling time.
Keep in mind that while the baking time is relatively short, allowing the bars to cool completely is essential for the best results. I usually take this time to clean up my kitchen or enjoy a cup of tea while I wait. It’s all part of the baking experience!
Nutritional Information for Raspberry Lemon Bars Recipe
As a passionate home cook, I always find it helpful to know the nutritional information of the dishes I prepare. It allows me to enjoy my creations while being mindful of what I’m eating. Here’s a breakdown of the nutritional content for a single serving of my Raspberry Lemon Bars Recipe, assuming the recipe yields 16 bars:
- Calories: Approximately 150 calories per bar
- Fat: 7g (Saturated Fat: 4g)
- Carbohydrates: 20g (Fiber: 1g, Sugars: 10g)
- Protein: 2g
- Sodium: 50mg
Keep in mind that these values can vary based on the specific ingredients you use and any optional add-ons you choose to include. For instance, if you decide to add whipped cream or serve with extra berries, the nutritional content will change accordingly. I love to enjoy these bars in moderation, savoring each bite while sharing them with friends and family!
Whether you’re counting calories or just looking to indulge, these raspberry lemon bars are a delightful treat that can fit into a balanced diet. Plus, the fresh ingredients make them a healthier option compared to many store-bought desserts. So, go ahead and treat yourself—you deserve it!
Frequently Asked Questions about Raspberry Lemon Bars Recipe
As I’ve shared my Raspberry Lemon Bars Recipe with friends and family, I’ve noticed a few common questions pop up. It’s always great to clarify any doubts, especially when it comes to baking. So, let’s tackle some of the most frequently asked questions to help you on your baking journey!
Can I use frozen raspberries instead of fresh ones?
Absolutely! Frozen raspberries work just fine in this recipe. Just make sure to thaw and drain them before adding them to the filling. This way, you won’t end up with excess moisture that could affect the texture of your bars. I’ve used frozen raspberries many times, and they still taste delicious!
How do I store leftover raspberry lemon bars?
To keep your bars fresh, store them in an airtight container in the refrigerator. They can last for about 3-5 days. If you want to keep them longer, you can freeze them! Just wrap each bar tightly in plastic wrap and place them in a freezer-safe container. They’ll be ready to enjoy whenever you have a sweet craving!
Can I make these bars ahead of time?
Yes, you can! In fact, making them a day in advance can enhance the flavors. Just be sure to let them cool completely before storing them in the fridge. This way, they’ll be perfectly set and ready to impress your guests when you serve them!
What can I substitute for eggs in this recipe?
If you’re looking for an egg substitute, I recommend using flax eggs. To make one flax egg, mix one tablespoon of ground flaxseed with three tablespoons of water and let it sit for about five minutes until it thickens. This works wonderfully in the lemon filling and keeps the bars vegan-friendly!
Can I add other fruits to the recipe?
Of course! While raspberries are the star of the show, you can experiment with other fruits like blueberries, blackberries, or even diced strawberries. Just keep in mind that the flavor profile will change slightly, but it’s a fun way to mix things up!
These questions are just a few of the common queries I’ve encountered while baking my raspberry lemon bars. I hope this helps clear up any uncertainties you might have. Remember, baking is all about having fun and experimenting, so don’t hesitate to make this recipe your own!
Conclusion on Raspberry Lemon Bars Recipe
As we wrap up our delightful journey through the world of raspberry lemon bars, I can’t help but feel a sense of joy. These bars are more than just a dessert; they’re a celebration of flavors, memories, and the simple pleasure of baking. The combination of zesty lemon and sweet raspberries creates a symphony of taste that dances on your palate, making every bite a little piece of heaven.
What I love most about this Raspberry Lemon Bars Recipe is its versatility. Whether you’re hosting a summer gathering, enjoying a cozy afternoon at home, or looking for a sweet treat to share with loved ones, these bars fit the bill perfectly. Plus, they’re easy to make, allowing even novice bakers to shine in the kitchen!
So, I encourage you to gather your ingredients, roll up your sleeves, and dive into this delicious adventure. With each batch you create, you’ll not only be treating yourself but also spreading joy to those around you. Remember, baking is about creating memories, and I can’t wait for you to make your own with these scrumptious raspberry lemon bars. Happy baking!