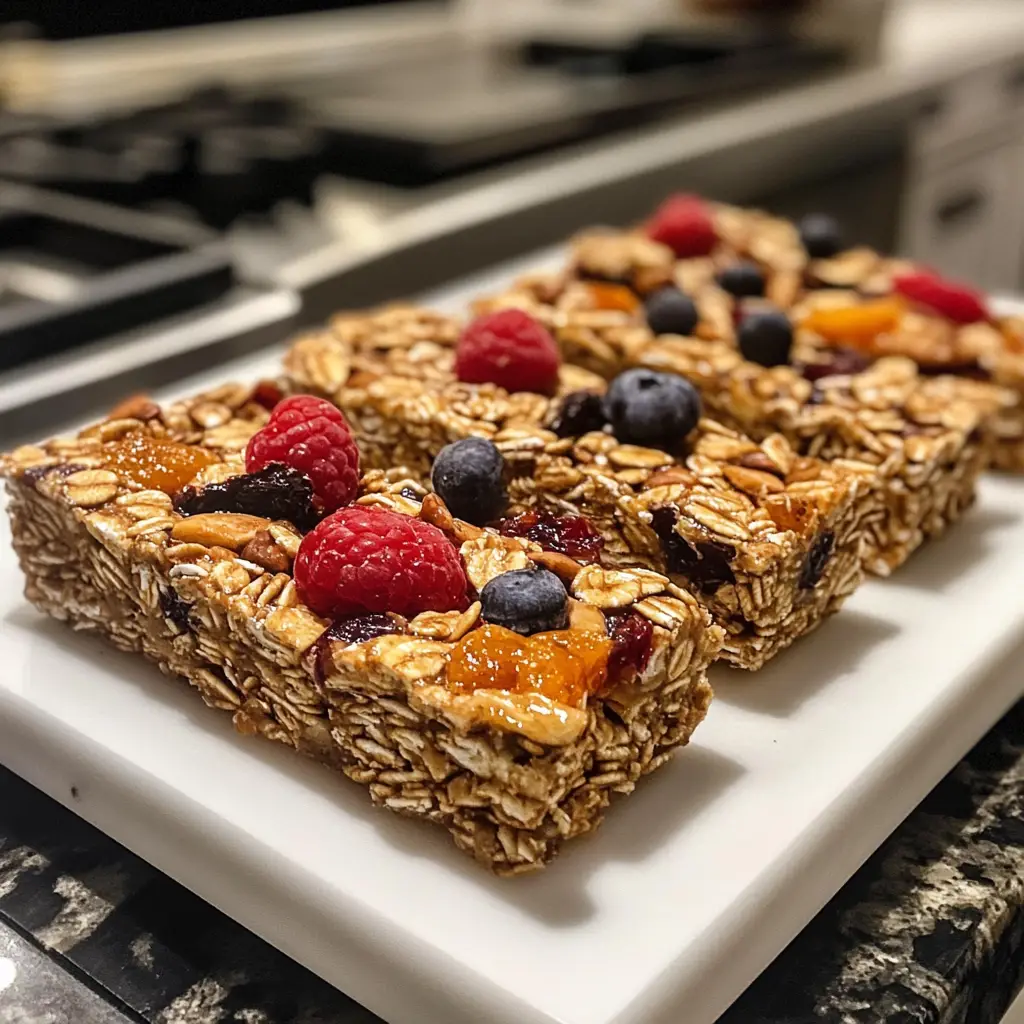
Introduction to Homemade Granola Bars Recipe
As a passionate home cook, I find joy in creating snacks that are not only delicious but also wholesome. One of my all-time favorites is the homemade granola bar. These little squares of goodness have been a staple in my kitchen for years. They are perfect for busy mornings, afternoon pick-me-ups, or even a late-night snack. The best part? You can customize them to suit your taste!
My journey with granola bars began when I was searching for a healthier alternative to store-bought snacks. I wanted something that packed a punch of flavor without all the added sugars and preservatives. After a few experiments, I discovered the magic of making my own granola bars. The aroma of oats and honey wafting through my kitchen is enough to make anyone’s mouth water!
What I love most about this homemade granola bars recipe is its versatility. You can mix and match ingredients based on what you have on hand or what you crave. Want a nutty flavor? Toss in some almonds or walnuts. Craving a hint of sweetness? Dried fruits like cranberries or apricots do the trick. The possibilities are endless, and that’s what makes this recipe so special.
In this article, I’ll guide you through the process of making your very own granola bars. From the ingredients to the baking tips, I’ll share everything you need to know to create a snack that’s not only tasty but also packed with nutrients. So, grab your apron, and let’s dive into the world of homemade granola bars!
Ingredients for Homemade Granola Bars Recipe
Before we embark on our granola bar adventure, let’s gather our ingredients. I always say that the quality of your ingredients can make or break a recipe. So, let’s make sure we’re using the best! Here’s what you’ll need:
Main Ingredients
- 2 cups rolled oats – I prefer old-fashioned oats for their chewy texture.
- 1 cup nuts (almonds, walnuts, or pecans) – Chopped for a delightful crunch.
- 1/2 cup honey or maple syrup – This adds natural sweetness and binds everything together.
- 1/2 cup nut butter (peanut, almond, or sunflower) – Creamy and rich, it enhances flavor.
- 1/2 teaspoon vanilla extract – A splash of this elevates the taste.
- 1/4 teaspoon salt – Just a pinch to balance the sweetness.
These main ingredients create a solid base for your granola bars. I often find myself reaching for organic options, especially for the honey and nut butter, as they tend to have a richer flavor. Plus, it feels good to support local farmers!
Optional Add-ons
Now, let’s get creative! Here are some optional ingredients you can add to personalize your granola bars:
- 1/2 cup dried fruits (cranberries, raisins, or apricots) – For a chewy, fruity burst.
- 1/4 cup chocolate chips or cacao nibs – Because who doesn’t love a little chocolate?
- 1/4 cup seeds (chia, flax, or pumpkin) – For an extra nutritional boost.
- 1 teaspoon cinnamon or nutmeg – A sprinkle of spice can add warmth and depth.
Feel free to mix and match these add-ons based on your preferences. I often toss in whatever I have in my pantry. One time, I even added a handful of coconut flakes, and it was a game-changer! The key is to have fun and experiment.
How to Prepare Homemade Granola Bars Recipe
Now that we have our ingredients ready, it’s time to roll up our sleeves and get cooking! Making homemade granola bars is a straightforward process, and I promise you’ll feel a sense of accomplishment once you see (and taste) the final product. Let’s dive into the steps!
Step 1: Preheat the Oven
The first step is to preheat your oven to 350°F (175°C). This ensures that your granola bars bake evenly and come out perfectly golden.
Tips for Preheating
- While the oven is heating, you can prepare the rest of your ingredients. This saves time and keeps you organized.
- Make sure to use an oven thermometer if you have one. It helps ensure your oven is at the right temperature.
Step 2: Mix Dry Ingredients
In a large mixing bowl, combine the rolled oats, chopped nuts, and any optional add-ins like seeds or spices. Stir them together until they’re well mixed.
Tips for Mixing
- Use a whisk or a fork to break up any clumps in the oats. This helps distribute the ingredients evenly.
- Feel free to adjust the amount of nuts or seeds based on your preference. I often add a bit more for extra crunch!
Step 3: Combine Wet Ingredients
In a separate bowl, mix together the honey (or maple syrup), nut butter, vanilla extract, and salt. Stir until everything is well combined and smooth.
Tips for Combining
- If your nut butter is too thick, try warming it slightly in the microwave for about 10 seconds. This makes it easier to mix.
- Don’t skip the salt! It enhances the flavors and balances the sweetness.
Step 4: Mix Wet and Dry Ingredients
Now, pour the wet mixture into the bowl with the dry ingredients. Stir everything together until the oats and nuts are fully coated.
Tips for Proper Mixing
- Use a spatula or wooden spoon to fold the ingredients together gently. This helps prevent breaking the nuts.
- Make sure there are no dry spots. If the mixture seems too dry, you can add a splash of water or more nut butter.
Step 5: Press Mixture into Pan
Line an 8×8 inch baking pan with parchment paper for easy removal. Then, transfer the granola mixture into the pan and press it down firmly with your hands or a spatula.
Tips for Pressing
- Pressing firmly is key! This helps the bars hold together once baked. I like to use a flat-bottomed measuring cup to get an even surface.
- Make sure the mixture is evenly spread out in the pan. This ensures even baking.
Step 6: Bake the Granola Bars
Place the pan in the preheated oven and bake for about 20-25 minutes, or until the edges are golden brown.
Tips for Baking
- Keep an eye on the bars as they bake. Ovens can vary, and you don’t want them to burn!
- If you like a crunchier texture, you can bake them a few minutes longer, but be careful not to overdo it.
Step 7: Cool and Cut
Once baked, remove the pan from the oven and let it cool completely in the pan. This is crucial for the bars to set properly.
Tips for Cooling
- After about 10-15 minutes, you can lift the granola out of the pan using the parchment paper. Let it cool on a wire rack for even better results.
- Once cooled, use a sharp knife to cut the bars into your desired size. I usually go for squares or rectangles, but feel free to get creative!
And there you have it! Your homemade granola bars are ready to be enjoyed. I can’t wait for you to experience the satisfaction of making these delicious snacks from scratch!
Equipment Needed for Homemade Granola Bars Recipe
Before we dive into the kitchen, let’s make sure we have the right tools at our disposal. Having the right equipment can make the process smoother and more enjoyable. Here’s what you’ll need to whip up your homemade granola bars:
- Mixing Bowls: A large mixing bowl for combining your dry ingredients and a smaller one for the wet ingredients. If you don’t have a mixing bowl, any large container will do!
- Baking Pan: An 8×8 inch baking pan is ideal for this recipe. If you don’t have one, a similar-sized dish or even a loaf pan can work in a pinch.
- Parchment Paper: This is essential for easy removal of the granola bars. If you’re out of parchment paper, you can lightly grease the pan with oil or butter.
- Spatula or Wooden Spoon: For mixing and pressing the ingredients. If you don’t have these, a sturdy fork can also do the trick!
- Measuring Cups and Spoons: Accurate measurements are key to a successful recipe. If you don’t have measuring tools, you can use a standard cup or spoon, but keep in mind that results may vary.
- Wire Rack: This is optional but helpful for cooling the granola bars evenly. If you don’t have one, just let them cool in the pan.
With these tools in hand, you’re all set to create your delicious homemade granola bars. I remember the first time I made them; I was amazed at how simple it was with the right equipment. So, gather your tools, and let’s get cooking!
Variations of Homemade Granola Bars Recipe
One of the best things about making homemade granola bars is the endless possibilities for variations. I love experimenting with different flavors and textures, and I encourage you to do the same! Here are a few delightful twists you can try:
- Chocolate Peanut Butter: Swap out the nut butter for chocolate peanut butter and add chocolate chips for a rich, indulgent treat.
- Fruit and Nut Medley: Mix in a variety of dried fruits like apricots, figs, and cherries along with a mix of nuts for a burst of flavor in every bite.
- Spiced Pumpkin: Add pumpkin puree and a teaspoon of pumpkin spice for a seasonal twist. This variation is perfect for fall!
- Coconut Almond: Incorporate shredded coconut and almond extract for a tropical vibe. You can even top it with a drizzle of dark chocolate.
- Maple Pecan: Use maple syrup as your sweetener and add chopped pecans for a sweet and nutty flavor that’s hard to resist.
These variations not only keep things exciting but also allow you to cater to different tastes and dietary preferences. I often find myself making a new batch with whatever I have on hand, and it’s always a fun surprise to see how they turn out. So, don’t hesitate to get creative and make these granola bars your own!
Cooking Notes for Homemade Granola Bars Recipe
As I’ve learned through my culinary adventures, a few cooking notes can make a world of difference when it comes to perfecting your homemade granola bars. Here are some tips that I’ve gathered over the years to ensure your bars turn out just right:
- Storage: Once your granola bars are cut, store them in an airtight container. They can last up to a week at room temperature or even longer in the fridge. I love to wrap them individually for easy grab-and-go snacks!
- Texture: If you prefer chewy bars, don’t bake them too long. For crunchier bars, a few extra minutes in the oven can do the trick. Just keep an eye on them to avoid burning!
- Ingredient Swaps: Feel free to substitute ingredients based on your dietary needs. For instance, if you’re nut-free, sunflower seed butter works beautifully in place of nut butter.
- Mixing Techniques: When mixing, be sure to coat all the dry ingredients with the wet mixture. This ensures every bite is flavorful and satisfying. I often use my hands to really get in there!
- Cooling Time: Patience is key! Allowing the bars to cool completely in the pan helps them set properly. If you cut them too soon, they might crumble.
These cooking notes have helped me refine my granola bar-making skills, and I hope they do the same for you. Remember, cooking is all about experimenting and finding what works best for you. Enjoy the process, and happy baking!
Serving Suggestions for Homemade Granola Bars Recipe
Now that your homemade granola bars are ready, it’s time to enjoy them! I love to get creative with how I serve these delightful treats. Here are some of my favorite serving suggestions that elevate the experience:
- On-the-Go Snack: Wrap individual bars in parchment paper or foil for a quick, portable snack. They’re perfect for busy mornings or afternoon hikes!
- With Yogurt: Crumble a granola bar over a bowl of yogurt for a delicious breakfast or snack. The crunch pairs beautifully with the creaminess of the yogurt.
- As a Dessert: Drizzle melted dark chocolate over the bars for a sweet finish. This adds a touch of indulgence that’s hard to resist!
- With Fresh Fruit: Serve your granola bars alongside fresh fruit like berries or banana slices. This adds a refreshing contrast and boosts the nutritional value.
- In a Trail Mix: Chop the bars into bite-sized pieces and mix them with nuts, seeds, and dried fruits for a homemade trail mix. It’s a great snack for road trips or movie nights!
These serving suggestions not only enhance the flavor but also make your homemade granola bars even more enjoyable. I often find myself experimenting with different pairings, and it’s always a delightful surprise. So, go ahead and try these ideas, or come up with your own! The sky’s the limit when it comes to enjoying your delicious creations.
Tips for Perfect Homemade Granola Bars Recipe
As I’ve crafted my homemade granola bars over the years, I’ve picked up a few tips that can truly elevate your baking game. These little nuggets of wisdom can help ensure your bars turn out perfectly every time. Here’s what I’ve learned:
- Don’t Skip the Pressing: Pressing the mixture firmly into the pan is crucial. It helps the bars hold together and prevents them from crumbling. I like to use a flat-bottomed measuring cup to get an even surface.
- Experiment with Sweeteners: While honey and maple syrup are my go-to sweeteners, you can also try agave nectar or brown rice syrup. Each brings a unique flavor to the bars!
- Chill Before Cutting: If you have the time, chilling the baked bars in the fridge for about 30 minutes before cutting can make them easier to slice and help them hold their shape.
- Mix in Fresh Ingredients: If you’re adding fresh ingredients like chocolate chips or dried fruits, fold them in gently after mixing the wet and dry ingredients. This keeps them intact and evenly distributed.
- Adjust for Your Oven: Every oven is different! If you notice your granola bars browning too quickly, consider lowering the temperature by 25°F (about 15°C) and baking a little longer.
These tips have helped me create granola bars that are not only delicious but also have the perfect texture. I hope they inspire you to experiment and find your own perfect version of this delightful snack. Happy baking!
Breakdown of Time for Homemade Granola Bars Recipe
When it comes to making homemade granola bars, I love knowing exactly how much time I need to set aside. It helps me plan my day and ensures I can enjoy these tasty treats without feeling rushed. Here’s a quick breakdown of the time involved in this delightful recipe:
- Prep Time: Approximately 15 minutes. This includes gathering your ingredients, mixing the dry and wet components, and pressing the mixture into the pan. I often find that having everything prepped and ready makes the process smoother!
- Cooking Time: About 20-25 minutes. This is the time it takes for the granola bars to bake to golden perfection. Keep an eye on them, as ovens can vary!
- Total Time: Roughly 40-45 minutes. This includes both prep and cooking time. Plus, don’t forget to factor in a little cooling time before you cut into those delicious bars!
Knowing this time breakdown helps me fit granola bar making into my busy schedule. Whether I’m whipping them up for a snack or preparing for a road trip, I can always count on this recipe to be quick and easy. I hope this helps you plan your granola bar adventure too!
Nutritional Information for Homemade Granola Bars Recipe
As a home cook, I always pay attention to the nutritional value of the meals and snacks I prepare. These homemade granola bars are not only delicious but also packed with nutrients that can fuel your day. Here’s a general breakdown of the nutritional information for one granola bar, assuming you cut the batch into 12 bars:
- Calories: Approximately 150-200 calories per bar, depending on the ingredients used.
- Protein: About 4-6 grams, thanks to the nuts and nut butter.
- Carbohydrates: Roughly 20-25 grams, primarily from oats and any added fruits.
- Fat: Around 6-10 grams, mostly healthy fats from nuts and nut butter.
- Fiber: Approximately 2-4 grams, which helps keep you feeling full and satisfied.
- Sugar: About 5-10 grams, depending on the sweeteners and any dried fruits added.
These numbers can vary based on the specific ingredients and portion sizes you choose. I love that I can control what goes into my granola bars, making them a healthier option compared to many store-bought snacks. Plus, with the right mix of ingredients, you can tailor the nutritional profile to fit your dietary needs. So, enjoy these bars guilt-free, knowing they’re a wholesome treat!
Frequently Asked Questions about Homemade Granola Bars Recipe
As I’ve shared my homemade granola bars recipe with friends and family, I’ve noticed a few common questions pop up. It’s always great to clarify any doubts, especially when it comes to creating something as delightful as these bars. Here are some frequently asked questions that I hope will help you on your granola bar journey:
Can I make these granola bars vegan?
Absolutely! To make your granola bars vegan, simply substitute honey with maple syrup or agave nectar. Both options provide the sweetness you need without any animal products. I’ve made this swap many times, and the bars turn out just as delicious!
How do I store homemade granola bars?
Once your granola bars are cut, store them in an airtight container. They can last up to a week at room temperature. If you want them to last longer, pop them in the fridge, where they can stay fresh for up to two weeks. I love wrapping them individually for easy grab-and-go snacks!
Can I freeze granola bars?
Yes, you can! Freezing granola bars is a great way to keep them fresh for longer. Just wrap each bar tightly in plastic wrap or foil, then place them in a freezer-safe bag. They can last for up to three months in the freezer. When you’re ready to enjoy one, simply let it thaw at room temperature for a bit.
What can I use instead of nuts?
If you’re looking for a nut-free option, you can easily substitute nuts with seeds like pumpkin or sunflower seeds. Sunflower seed butter is also a fantastic alternative to nut butter. I’ve made delicious bars using these swaps, and they still pack a great crunch!
Can I add protein powder to the recipe?
Yes, you can! Adding protein powder is a great way to boost the nutritional value of your granola bars. Just be mindful of the moisture content; you may need to adjust the wet ingredients slightly. I usually add a scoop of protein powder to my mixture, and it works beautifully!
These questions cover some of the most common concerns I’ve encountered while making homemade granola bars. I hope this section helps clear up any uncertainties you might have. Remember, the beauty of cooking is in the experimentation, so feel free to adapt the recipe to suit your needs and preferences!
Conclusion on Homemade Granola Bars Recipe
In conclusion, making homemade granola bars is not just a fun culinary adventure; it’s a rewarding experience that brings wholesome goodness right to your kitchen. These bars are incredibly versatile, allowing you to customize them to fit your taste and dietary needs. Whether you prefer a nutty crunch, a fruity burst, or a touch of chocolate, the possibilities are endless!
What I love most about this homemade granola bars recipe is how it empowers you to take control of your snacking. You can choose high-quality ingredients, avoid unnecessary additives, and create a treat that’s both delicious and nutritious. Plus, they’re perfect for on-the-go lifestyles, making them an ideal companion for busy mornings or afternoon cravings.
So, gather your ingredients, roll up your sleeves, and dive into the delightful world of homemade granola bars. I promise you’ll feel a sense of pride with every bite, knowing you’ve crafted something special from scratch. Happy baking, and enjoy your delicious creations!