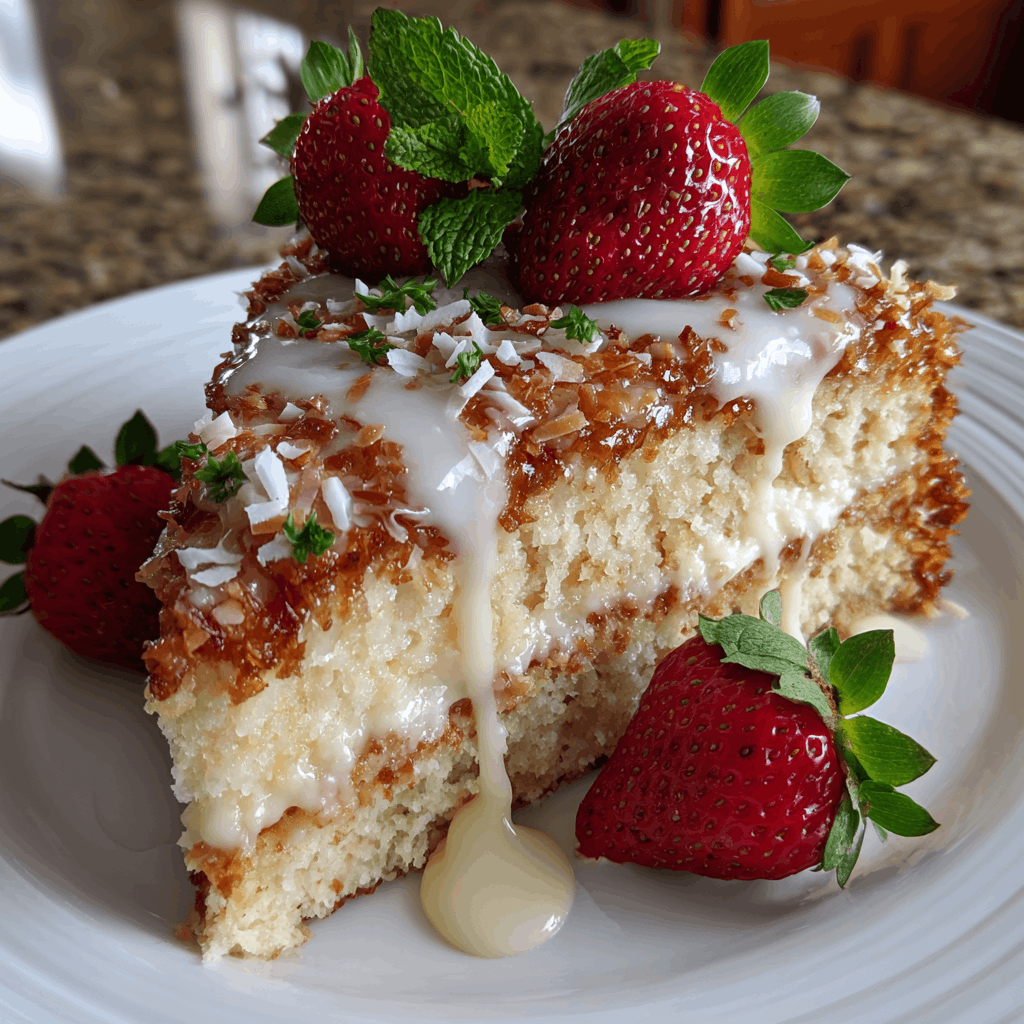
Introduction to Coconut Layer Cake
There’s something magical about a Coconut Layer Cake that brings a smile to my face. Maybe it’s the fluffy layers or the creamy frosting that feels like a warm hug. As a busy mom, I know how precious time is, and this delightful cake is a quick solution for those moments when you want to impress your loved ones without spending hours in the kitchen. Whether it’s a birthday, a family gathering, or just a sweet treat for the week, this Coconut Layer Cake is sure to become a cherished favorite in your home.
Why You’ll Love This Coconut Layer Cake
This Coconut Layer Cake is not just a dessert; it’s a celebration of flavor and simplicity. With its moist texture and rich coconut taste, it’s a crowd-pleaser that requires minimal effort. You can whip it up in no time, making it perfect for busy days. Plus, the delightful aroma that fills your kitchen while it bakes is simply irresistible. Trust me, this cake will have everyone asking for seconds!
Ingredients for Coconut Layer Cake
Gathering the right ingredients is the first step to creating your Coconut Layer Cake masterpiece. Here’s what you’ll need:
- All-purpose flour: This is the backbone of your cake, providing structure and texture.
- Baking powder: A leavening agent that helps your cake rise, making it light and fluffy.
- Salt: Just a pinch enhances the flavors and balances the sweetness.
- Unsalted butter: Adds richness and moisture; make sure it’s softened for easy creaming.
- Granulated sugar: Sweetens the cake and contributes to its tender crumb.
- Large eggs: They bind the ingredients together and add moisture.
- Vanilla extract: A classic flavor enhancer that complements the coconut beautifully.
- Coconut milk: This creamy liquid infuses the cake with a rich coconut flavor.
- Shredded coconut: Adds texture and a burst of coconut goodness in every bite.
- Coconut frosting: The crowning glory of your cake, making it irresistibly creamy and sweet.
For those looking to amp up the coconut flavor, consider adding a splash of coconut extract along with the vanilla. And remember, all ingredients should be at room temperature for the best results. If you’re curious about exact measurements, they’re available at the bottom of the article for easy printing!
How to Make Coconut Layer Cake
Step 1: Preheat and Prepare
Let’s get started! First, preheat your oven to 350°F (175°C). This step is crucial for ensuring your Coconut Layer Cake bakes evenly. While the oven warms up, grab three 9-inch round cake pans and grease them well. You can use butter or non-stick spray. This will help the cakes release easily once they’re baked. I like to line the bottoms with parchment paper for extra assurance. Trust me, you don’t want to lose any of that delicious cake!
Step 2: Mix Dry Ingredients
In a medium bowl, whisk together the all-purpose flour, baking powder, and salt. This step is essential for evenly distributing the leavening agent throughout the flour. It helps your cake rise beautifully. Make sure there are no lumps in the flour. A smooth mixture will lead to a light and fluffy Coconut Layer Cake. Set this bowl aside while you move on to the next step.
Step 3: Cream Butter and Sugar
In a large mixing bowl, cream the softened unsalted butter and granulated sugar together. Use an electric mixer on medium speed until the mixture is light and fluffy. This usually takes about 3-5 minutes. The air you incorporate here is what gives your cake that lovely texture. Don’t rush this step; it’s worth the wait for that perfect Coconut Layer Cake!
Step 4: Add Eggs and Vanilla
Now, it’s time to add the eggs! Crack them in one at a time, mixing well after each addition. This ensures they’re fully incorporated. Then, stir in the vanilla extract. The aroma of vanilla combined with the butter and sugar is heavenly! It’s like a warm hug for your senses. This mixture will be the base of your moist cake.
Step 5: Combine Wet and Dry Ingredients
Next, it’s time to bring everything together. Gradually add the dry ingredients to the wet mixture, alternating with the coconut milk. Start with a third of the dry mix, then add half of the coconut milk, and repeat until everything is combined. This method helps prevent lumps and keeps your batter smooth. Be careful not to overmix; just stir until everything is combined. Your Coconut Layer Cake batter should be thick and creamy!
Step 6: Fold in Shredded Coconut
Now comes the fun part! Gently fold in the shredded coconut. Use a spatula to carefully incorporate it into the batter. Folding is key here; you want to keep the airiness of the batter intact. This shredded coconut will add delightful texture and bursts of flavor in every bite. It’s like a little surprise waiting to be discovered!
Step 7: Bake the Cakes
Divide the batter evenly among the three prepared cake pans. Smooth the tops with a spatula for an even bake. Pop them into the preheated oven and bake for 25-30 minutes. You’ll know they’re done when a toothpick inserted in the center comes out clean. The aroma wafting through your kitchen will be simply irresistible!
Step 8: Cool and Frost
Once baked, let the cakes cool in the pans for about 10 minutes. Then, carefully transfer them to wire racks to cool completely. This step is crucial; you don’t want to frost a warm cake! Once cooled, it’s time to frost! Spread a generous layer of coconut frosting between each layer and on top. For an extra touch, sprinkle some shredded coconut on top. Your Coconut Layer Cake is now ready to shine!
Tips for Success
- Always use room temperature ingredients for a smoother batter.
- Don’t skip the creaming step; it’s vital for a fluffy cake.
- Check your oven temperature with an oven thermometer for accuracy.
- Let the cakes cool completely before frosting to avoid melting.
- For a decorative touch, toast the shredded coconut before sprinkling on top.
Equipment Needed
- Three 9-inch round cake pans (or two pans if you prefer to bake in batches)
- Mixing bowls (a large one for wet ingredients and a medium one for dry)
- Electric mixer (a whisk works too, but it’ll take longer)
- Spatula for folding and smoothing
- Wire racks for cooling the cakes
Variations of Coconut Layer Cake
- Chocolate Coconut Layer Cake: Add cocoa powder to the batter for a rich chocolate twist. Pair it with chocolate frosting for a decadent treat.
- Gluten-Free Coconut Layer Cake: Substitute all-purpose flour with a gluten-free flour blend. Ensure your baking powder is gluten-free as well.
- Vegan Coconut Layer Cake: Replace eggs with flaxseed meal mixed with water and use coconut oil instead of butter. Opt for a plant-based milk for a dairy-free version.
- Almond Coconut Layer Cake: Incorporate almond extract along with the vanilla for a nutty flavor that complements the coconut beautifully.
- Fruit-Infused Coconut Layer Cake: Add crushed pineapple or mango puree to the batter for a tropical twist. This adds moisture and a burst of fruity flavor.
Serving Suggestions for Coconut Layer Cake
- Pair with a scoop of vanilla ice cream for a delightful contrast.
- Serve alongside fresh berries for a pop of color and tartness.
- Drizzle with a coconut glaze for an extra touch of sweetness.
- Enjoy with a cup of hot tea or coffee to enhance the flavors.
- Garnish with mint leaves for a fresh, vibrant presentation.
FAQs about Coconut Layer Cake
Can I make Coconut Layer Cake ahead of time?
Absolutely! This Coconut Layer Cake can be made a day in advance. Just store it in the refrigerator after frosting. The flavors will meld beautifully overnight, making it even more delicious!
What can I substitute for coconut milk?
If you don’t have coconut milk on hand, you can use whole milk or almond milk. However, for that signature coconut flavor, coconut milk is the best choice!
How do I store leftover Coconut Layer Cake?
Store any leftover cake in an airtight container in the refrigerator. It should stay fresh for about 3-4 days. Just be sure to let it come to room temperature before serving for the best taste!
Can I freeze Coconut Layer Cake?
Yes, you can freeze this cake! Wrap each layer tightly in plastic wrap and then in aluminum foil. It can be frozen for up to three months. Just thaw it in the fridge overnight before frosting and serving.
What’s the best way to frost the Coconut Layer Cake?
For a smooth finish, use a spatula to spread the frosting evenly between the layers and on top. A bench scraper can help create clean edges. Don’t forget to sprinkle extra shredded coconut on top for that beautiful finish!
Final Thoughts
Making this Coconut Layer Cake is more than just baking; it’s about creating sweet memories in your kitchen. The joy of watching your loved ones savor each slice is truly priceless. This cake brings a touch of celebration to any occasion, whether it’s a birthday or a simple family dinner. Plus, the delightful aroma that fills your home while it bakes is a bonus! So, roll up your sleeves, gather your ingredients, and let the magic unfold. I promise, this Coconut Layer Cake will become a beloved staple in your home, bringing smiles and happiness with every bite!
Print
Coconut Layer Cake: Discover Irresistible Bliss Today!
- Total Time: 1 hour
- Yield: 12 servings 1x
- Diet: Vegetarian
Description
A delightful and moist coconut layer cake that is perfect for any occasion, featuring layers of fluffy coconut-flavored cake and creamy coconut frosting.
Ingredients
- 2 1/2 cups all-purpose flour
- 2 1/2 tsp baking powder
- 1/2 tsp salt
- 1 cup unsalted butter, softened
- 2 cups granulated sugar
- 4 large eggs
- 1 tsp vanilla extract
- 1 cup coconut milk
- 1 1/2 cups shredded coconut
- 1 batch coconut frosting
Instructions
- Preheat the oven to 350°F (175°C) and grease three 9-inch round cake pans.
- In a bowl, whisk together flour, baking powder, and salt.
- In a separate bowl, cream the butter and sugar until light and fluffy.
- Add eggs one at a time, mixing well after each addition, then stir in vanilla extract.
- Gradually add the dry ingredients to the wet mixture, alternating with coconut milk, and mix until just combined.
- Fold in shredded coconut.
- Divide the batter evenly among the prepared pans and smooth the tops.
- Bake for 25-30 minutes or until a toothpick inserted in the center comes out clean.
- Let the cakes cool in the pans for 10 minutes, then transfer to wire racks to cool completely.
- Once cooled, frost the layers with coconut frosting and top with additional shredded coconut if desired.
Notes
- For a more intense coconut flavor, use coconut extract in addition to vanilla.
- Ensure all ingredients are at room temperature for best results.
- This cake can be made a day in advance and stored in the refrigerator.
- Prep Time: 30 minutes
- Cook Time: 30 minutes
- Category: Dessert
- Method: Baking
- Cuisine: American
Nutrition
- Serving Size: 1 slice
- Calories: 350
- Sugar: 25g
- Sodium: 200mg
- Fat: 15g
- Saturated Fat: 10g
- Unsaturated Fat: 3g
- Trans Fat: 0g
- Carbohydrates: 50g
- Fiber: 1g
- Protein: 4g
- Cholesterol: 80mg
Keywords: Coconut Layer Cake, Coconut Cake, Dessert, Baking