Introduction to Chocolate-Dipped Strawberry Shortcake Cones
As a busy mom, I know how precious time can be, especially when it comes to whipping up something sweet. That’s why I absolutely adore these Chocolate-Dipped Strawberry Shortcake Cones! They’re not just a treat; they’re a delightful way to bring a smile to your loved ones’ faces without spending hours in the kitchen. With just a handful of ingredients and minimal prep, you can create a dessert that feels special yet is incredibly easy to make. Trust me, these cones are a quick solution for a busy day, and they taste like pure joy!
Why You’ll Love This Chocolate-Dipped Strawberry Shortcake Cones
These Chocolate-Dipped Strawberry Shortcake Cones are a game-changer for busy days! They come together in just 20 minutes, making them perfect for last-minute gatherings or a sweet family treat. The combination of fresh strawberries, creamy whipped topping, and rich chocolate creates a flavor explosion that’s hard to resist. Plus, they’re a fun, hands-on dessert that kids can help with, turning dessert time into a delightful family activity!
Ingredients for Chocolate-Dipped Strawberry Shortcake Cones
Gathering the right ingredients is the first step to creating these delightful Chocolate-Dipped Strawberry Shortcake Cones. Here’s what you’ll need:
- Fresh strawberries: Sweet and juicy, these are the star of the show! Look for ripe, vibrant strawberries for the best flavor.
- Whipped cream: This adds a light, fluffy texture. You can use store-bought or make your own for a fresher taste.
- Sugar cones: These provide a crunchy base. They’re perfect for holding all the delicious fillings and toppings.
- Chocolate chips: Choose your favorite type—milk, dark, or even white chocolate! They’ll be melted for that irresistible dip.
- Coconut oil: This helps the chocolate melt smoothly and gives it a lovely sheen. You can substitute with vegetable oil if needed.
- Vanilla extract: A splash of this adds depth to the whipped cream, enhancing the overall flavor.
For those who want to get creative, feel free to add other fruits like bananas or blueberries, or even sprinkle some crushed nuts on top. The exact quantities for each ingredient are listed at the bottom of the article, ready for you to print out and take to the kitchen!
How to Make Chocolate-Dipped Strawberry Shortcake Cones
Now that you have all your ingredients ready, let’s dive into the fun part—making these Chocolate-Dipped Strawberry Shortcake Cones! Follow these simple steps, and you’ll have a delightful dessert in no time.
Step 1: Prepare the Strawberries
Start by hulling the strawberries. This means removing the green tops and the white core. A simple paring knife works wonders for this task. Once they’re hulled, slice the strawberries into thin pieces. Aim for even slices so they fit perfectly in your cones. The fresher the strawberries, the sweeter your cones will be!
Step 2: Make the Whipped Cream Mixture
In a mixing bowl, combine the whipped cream and a splash of vanilla extract. Use a whisk or an electric mixer to blend them together until soft peaks form. This will give your whipped cream a lovely, airy texture. If you’re feeling adventurous, you can even add a touch of powdered sugar for extra sweetness!
Step 3: Melt the Chocolate
Grab a microwave-safe bowl and add the chocolate chips along with the coconut oil. Microwave in 30-second intervals, stirring in between, until the mixture is smooth and glossy. Be careful not to overheat it! The chocolate should be warm but not bubbling. This melted chocolate will be the star of your cones!
Step 4: Dip the Sugar Cones
Now comes the fun part! Take each sugar cone and dip the top into the melted chocolate. Allow any excess chocolate to drip back into the bowl. This creates a beautiful chocolate coating that adds flavor and a touch of elegance. You can even twist the cone slightly for an even coating!
Step 5: Fill the Cones
Once the chocolate has set a bit, it’s time to fill the cones. Start by spooning in the whipped cream mixture, filling it generously. Then, top it off with your sliced strawberries. Don’t be shy—pack them in there! The more strawberries, the better the flavor.
Step 6: Drizzle with Chocolate
If you have any melted chocolate left, drizzle it over the filled cones for that extra touch of decadence. You can use a spoon or a piping bag for more control. This step not only looks beautiful but also adds another layer of chocolatey goodness!
Step 7: Chill Before Serving
Finally, place your completed cones in the refrigerator for about 30 minutes. This chilling time allows the chocolate to set and the flavors to meld together. Plus, it makes for a refreshing treat on a warm day. Trust me, the wait will be worth it!
Tips for Success
- Use ripe strawberries for the best flavor and sweetness.
- Don’t rush the chocolate melting process; stir often to avoid burning.
- Chill the cones for at least 30 minutes to ensure the chocolate sets properly.
- Feel free to experiment with different toppings like crushed nuts or sprinkles.
- Make extra whipped cream for a delightful dip on the side!
Equipment Needed
- Mixing bowl: A medium-sized bowl works best. You can use a large measuring cup if you don’t have one.
- Whisk or electric mixer: Either will do for whipping the cream. A fork can work in a pinch!
- Microwave-safe bowl: Essential for melting chocolate. A glass bowl is a great option.
- Paring knife: Perfect for hulling strawberries. A small kitchen knife will also suffice.
- Spoon: For filling the cones and drizzling chocolate. A tablespoon works well!
Variations
- Fruit Medley: Mix in other fruits like blueberries, raspberries, or bananas for a colorful twist.
- Nutty Delight: Add crushed nuts like almonds or walnuts for a crunchy texture and extra flavor.
- Chocolate Lovers: Use dark chocolate or even white chocolate for a different taste experience.
- Gluten-Free Option: Substitute sugar cones with gluten-free cones or even waffle bowls.
- Dairy-Free Version: Use coconut whipped cream and dairy-free chocolate chips for a vegan-friendly treat.
Serving Suggestions
- Pair these cones with a scoop of vanilla ice cream for an indulgent dessert.
- Serve alongside a refreshing fruit salad for a balanced treat.
- For drinks, consider iced tea or sparkling lemonade to complement the sweetness.
- Present on a colorful platter, garnished with mint leaves for a pop of color.
FAQs about Chocolate-Dipped Strawberry Shortcake Cones
Can I make Chocolate-Dipped Strawberry Shortcake Cones ahead of time?
Absolutely! You can prepare the cones a few hours in advance. Just keep them in the refrigerator until you’re ready to serve. This makes them a perfect option for parties or gatherings!
What can I substitute for sugar cones?
If sugar cones aren’t your thing, you can use waffle cones or even gluten-free cones. They’ll still hold all that delicious filling and look just as delightful!
How do I store leftover cones?
Store any leftover Chocolate-Dipped Strawberry Shortcake Cones in an airtight container in the refrigerator. They’re best enjoyed within a day or two for optimal freshness.
Can I use frozen strawberries instead of fresh?
While fresh strawberries are ideal, you can use frozen ones in a pinch. Just make sure to thaw and drain them well to avoid excess moisture in your cones.
What other toppings can I add to my cones?
The sky’s the limit! You can add crushed nuts, sprinkles, or even a drizzle of caramel sauce for an extra layer of flavor. Get creative and make them your own!
Final Thoughts
Creating these Chocolate-Dipped Strawberry Shortcake Cones is more than just making a dessert; it’s about crafting sweet memories with your loved ones. The joy of watching their faces light up as they take that first bite is priceless. This recipe is a reminder that even on the busiest days, you can whip up something special in no time. Whether it’s a family gathering or a simple treat after dinner, these cones bring a touch of magic to any occasion. So, roll up your sleeves and dive into this delightful adventure—you won’t regret it!
Print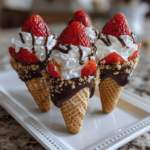
Chocolate-Dipped Strawberry Shortcake Cones that Delight!
- Total Time: 20 minutes
- Yield: 4 servings 1x
- Diet: Vegetarian
Description
Delicious chocolate-dipped strawberry shortcake cones that are perfect for a sweet treat.
Ingredients
- 1 cup fresh strawberries, hulled and sliced
- 1 cup whipped cream
- 4 sugar cones
- 1 cup chocolate chips
- 1 tablespoon coconut oil
- 1 teaspoon vanilla extract
Instructions
- Prepare the strawberries by hulling and slicing them.
- In a mixing bowl, combine the whipped cream and vanilla extract.
- In a microwave-safe bowl, melt the chocolate chips and coconut oil together until smooth.
- Dip the tops of the sugar cones into the melted chocolate, allowing excess to drip off.
- Fill each cone with whipped cream and top with sliced strawberries.
- Drizzle any remaining chocolate over the filled cones.
- Chill in the refrigerator for 30 minutes before serving.
Notes
- For a richer flavor, use dark chocolate instead of milk chocolate.
- These cones can be made ahead of time and stored in the refrigerator.
- Feel free to add other fruits or toppings as desired.
- Prep Time: 15 minutes
- Cook Time: 5 minutes
- Category: Dessert
- Method: No-bake
- Cuisine: American
Nutrition
- Serving Size: 1 cone
- Calories: 250
- Sugar: 15g
- Sodium: 50mg
- Fat: 12g
- Saturated Fat: 7g
- Unsaturated Fat: 3g
- Trans Fat: 0g
- Carbohydrates: 30g
- Fiber: 2g
- Protein: 3g
- Cholesterol: 20mg
Keywords: Chocolate-Dipped Strawberry Shortcake Cones, dessert, strawberries, chocolate