Introduction to Baked Chicken Cheese Dip
As a busy mom, I know how challenging it can be to whip up something delicious that everyone will love. That’s where my Baked Chicken Cheese Dip comes in! This creamy, cheesy delight is not just a treat for game days; it’s a quick solution for any gathering or even a cozy night in. Imagine the smiles on your loved ones’ faces as they dip into this warm, savory goodness. Trust me, this dip is a crowd-pleaser that will make you feel like a culinary rockstar, even on your busiest days!
Why You’ll Love This Baked Chicken Cheese Dip
This Baked Chicken Cheese Dip is a lifesaver for busy days. It’s incredibly easy to make, taking just 15 minutes of prep time. The rich, cheesy flavor is irresistible, making it a hit with both kids and adults alike. Plus, it’s versatile enough for any occasion, from game days to family gatherings. You’ll love how quickly it disappears, leaving you with nothing but happy faces around the table!
Ingredients for Baked Chicken Cheese Dip
Gathering the right ingredients is the first step to creating this mouthwatering Baked Chicken Cheese Dip. Here’s what you’ll need:
- Cooked chicken, shredded: This is the star of the dip! You can use rotisserie chicken for convenience or leftover chicken from a previous meal.
- Cream cheese, softened: This adds a rich, creamy texture that binds everything together. Make sure it’s at room temperature for easy mixing.
- Shredded cheddar cheese: The classic choice for cheesy goodness! Feel free to experiment with other cheeses like Monterey Jack for a twist.
- Sour cream: This adds a tangy flavor and creaminess. Greek yogurt can be a great substitute if you’re looking for a healthier option.
- Ranch dressing: A flavorful addition that enhances the dip’s taste. You can use homemade ranch for a fresher flavor or your favorite store-bought brand.
- Green onions, chopped: These add a fresh crunch and a pop of color. You can also use chives if you prefer a milder onion flavor.
- Garlic powder: A must-have for that savory depth. Fresh minced garlic works too, but adjust the amount to your taste.
- Onion powder: This complements the garlic and adds another layer of flavor. It’s a great way to enhance the overall taste without the texture of fresh onions.
- Salt and pepper: Essential for seasoning. Adjust these to your preference, but don’t skip them—they bring all the flavors together!
For those who like a kick, consider adding diced jalapeños or a splash of hot sauce. You can find the exact quantities for each ingredient at the bottom of the article, ready for printing!
How to Make Baked Chicken Cheese Dip
Now that you have all your ingredients ready, let’s dive into making this delicious Baked Chicken Cheese Dip! Follow these simple steps, and you’ll have a warm, cheesy dip that everyone will love.
Step 1: Preheat the Oven
First things first, preheat your oven to 350°F (175°C). Preheating is crucial because it ensures that your dip cooks evenly. If you skip this step, you might end up with a dip that’s hot on the outside but cold in the middle. Trust me, no one wants that!
Step 2: Mix the Ingredients
In a large mixing bowl, combine the shredded chicken, cream cheese, cheddar cheese, sour cream, ranch dressing, green onions, garlic powder, onion powder, salt, and pepper. Use a spatula or a hand mixer to blend everything together until it’s creamy and well combined. The texture should be smooth, with no lumps. This is where the magic happens, so mix it well!
Step 3: Transfer to Baking Dish
Once your mixture is ready, it’s time to transfer it to a baking dish. I recommend using a 9×9-inch dish for the perfect amount of dip. Spread the mixture evenly in the dish using a spatula. This helps it bake uniformly, so every bite is just as delicious as the last. Don’t be shy—make sure it’s nice and even!
Step 4: Bake the Dip
Now, pop your baking dish into the preheated oven. Bake for 25-30 minutes, or until the dip is bubbly and golden on top. You’ll know it’s done when the edges start to slightly brown. The aroma will fill your kitchen, making it hard to resist sneaking a taste!
Step 5: Cool and Serve
Once it’s out of the oven, let the dip cool for about 5-10 minutes. This is important because it allows the flavors to settle and makes it easier to scoop. Serve it warm with tortilla chips, crackers, or fresh veggies. Your guests will be diving in before you know it!
Tips for Success
- Make sure your cream cheese is softened for easy mixing.
- For a creamier dip, add a splash of milk or extra sour cream.
- Don’t skip the cooling time; it helps the dip hold its shape.
- Experiment with different cheeses for unique flavors.
- Use a larger baking dish if doubling the recipe to ensure even cooking.
Equipment Needed
- Mixing bowl: A large bowl for combining ingredients. A sturdy plastic or glass bowl works well.
- Spatula: Perfect for mixing and spreading the dip. A wooden or silicone spatula is ideal.
- Baking dish: A 9×9-inch dish is great, but any oven-safe dish will do.
- Oven mitts: Essential for safely handling hot dishes.
Variations of Baked Chicken Cheese Dip
- Spicy Kick: Add diced jalapeños or a few dashes of hot sauce for a fiery twist that spice lovers will adore.
- Buffalo Style: Mix in some buffalo sauce for a tangy, spicy flavor that pairs perfectly with celery sticks.
- Vegetarian Option: Substitute the chicken with black beans or chickpeas for a hearty, meatless dip that’s still packed with flavor.
- Cheesy Blend: Experiment with different cheeses like pepper jack, gouda, or feta for a unique taste experience.
- Herb Infusion: Add fresh herbs like cilantro or parsley for a burst of freshness that brightens the dip.
Serving Suggestions for Baked Chicken Cheese Dip
- Serve with crispy tortilla chips for the perfect crunch.
- Pair with fresh veggie sticks like carrots, celery, or bell peppers for a healthier option.
- Offer a selection of crackers for added variety.
- For drinks, consider pairing with a light beer or sparkling water.
- Garnish with extra green onions for a pop of color and freshness.
FAQs about Baked Chicken Cheese Dip
Can I make Baked Chicken Cheese Dip ahead of time?
Absolutely! You can prepare the dip a day in advance and store it in the refrigerator. Just cover it tightly with plastic wrap. When you’re ready to bake, let it sit at room temperature for about 15 minutes before popping it in the oven. This makes it a perfect game day dip!
What can I serve with Baked Chicken Cheese Dip?
This dip pairs wonderfully with tortilla chips, crackers, or fresh veggies like carrots and celery. You can also serve it with pita bread for a fun twist. The options are endless!
How do I store leftovers?
Leftovers can be stored in an airtight container in the fridge for up to three days. Just reheat in the microwave or oven until warmed through. It’s just as delicious the next day!
Can I freeze Baked Chicken Cheese Dip?
Yes, you can freeze it! Just make sure to store it in a freezer-safe container. When you’re ready to enjoy it, thaw it in the fridge overnight and then bake as directed. It’s a great way to have a quick snack on hand!
What if I don’t have ranch dressing?
No worries! You can substitute ranch dressing with a homemade version or use a different creamy dressing like blue cheese or Italian. It will still taste fantastic!
Final Thoughts
Making Baked Chicken Cheese Dip is more than just preparing a dish; it’s about creating moments of joy and connection. Whether it’s game day or a cozy family gathering, this dip brings everyone together, sparking laughter and conversation. I love watching my loved ones dive into the warm, cheesy goodness, their faces lighting up with every bite. It’s a simple recipe that transforms ordinary days into special occasions. So, roll up your sleeves, gather your ingredients, and let this delightful dip become a staple in your home. Trust me, you’ll be glad you did!
Print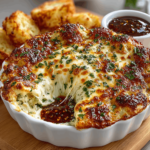
Baked Chicken Cheese Dip: A Delicious Game-Day Treat!
- Total Time: 45 minutes
- Yield: 8 servings 1x
- Diet: Gluten Free
Description
A creamy and cheesy dip made with chicken, perfect for game days or gatherings.
Ingredients
- 2 cups cooked chicken, shredded
- 1 cup cream cheese, softened
- 1 cup shredded cheddar cheese
- 1/2 cup sour cream
- 1/2 cup ranch dressing
- 1/4 cup green onions, chopped
- 1 teaspoon garlic powder
- 1 teaspoon onion powder
- Salt and pepper to taste
Instructions
- Preheat the oven to 350°F (175°C).
- In a large mixing bowl, combine the shredded chicken, cream cheese, cheddar cheese, sour cream, ranch dressing, green onions, garlic powder, onion powder, salt, and pepper.
- Mix until well combined and creamy.
- Transfer the mixture to a baking dish and spread it evenly.
- Bake in the preheated oven for 25-30 minutes, or until the dip is bubbly and golden on top.
- Remove from the oven and let it cool slightly before serving.
- Serve warm with tortilla chips, crackers, or veggies.
Notes
- For a spicier dip, add diced jalapeños or hot sauce.
- This dip can be made ahead of time and stored in the refrigerator before baking.
- Leftovers can be stored in an airtight container in the fridge for up to 3 days.
- Prep Time: 15 minutes
- Cook Time: 30 minutes
- Category: Appetizer
- Method: Baking
- Cuisine: American
Nutrition
- Serving Size: 1/2 cup
- Calories: 250
- Sugar: 2g
- Sodium: 500mg
- Fat: 18g
- Saturated Fat: 10g
- Unsaturated Fat: 6g
- Trans Fat: 0g
- Carbohydrates: 6g
- Fiber: 1g
- Protein: 15g
- Cholesterol: 60mg
Keywords: Baked Chicken Cheese Dip, Game Day Dip, Cheesy Chicken Dip