Introduction to Red Velvet Crinkle Cookies
As a busy mom, I know how precious time can be, especially when it comes to baking. That’s why I absolutely adore these Red Velvet Crinkle Cookies! They’re not just a feast for the eyes with their vibrant color, but they also deliver a delightful taste that will make your loved ones swoon. Whether you’re looking for a quick solution for a last-minute gathering or a sweet treat to brighten your day, these cookies are the perfect choice. Trust me, once you try them, they’ll become a staple in your baking repertoire!
Why You’ll Love This Red Velvet Crinkle Cookies
These Red Velvet Crinkle Cookies are a dream come true for busy lives! They’re incredibly easy to whip up, taking just about 45 minutes from start to finish. The soft, chewy texture combined with that rich, chocolatey flavor makes them irresistible. Plus, their stunning red hue adds a festive touch to any occasion. Whether it’s a family gathering or a cozy night in, these cookies will surely bring smiles all around!
Ingredients for Red Velvet Crinkle Cookies
Gathering the right ingredients is the first step to creating these delightful Red Velvet Crinkle Cookies. Here’s what you’ll need:
- All-purpose flour: This is the base of your cookies, providing structure and chewiness.
- Cocoa powder: Just a tablespoon adds a subtle chocolate flavor that complements the red velvet beautifully.
- Baking powder: This leavening agent helps the cookies rise, giving them that perfect soft texture.
- Salt: A pinch enhances the flavors, balancing the sweetness of the cookies.
- Unsalted butter: Softened butter creates a rich, creamy base for the dough, making it melt-in-your-mouth delicious.
- Granulated sugar: This sweetener adds sweetness and helps achieve that lovely crinkle effect.
- Large egg: The egg binds everything together, contributing to the cookies’ soft texture.
- Red food coloring: This is what gives the cookies their signature vibrant hue. Feel free to adjust the amount for a deeper color!
- Vanilla extract: A splash of vanilla adds warmth and depth to the flavor profile.
- Powdered sugar: Used for rolling the cookies, it creates a beautiful snowy coating that adds sweetness.
For those looking to make substitutions, you can use gluten-free flour for a gluten-free version or swap in coconut oil for a dairy-free option. If you want to add a twist, consider mixing in some chocolate chips or nuts!
Exact measurements for these ingredients can be found at the bottom of the article, ready for printing. Happy baking!
How to Make Red Velvet Crinkle Cookies
Step 1: Preheat and Prepare
First things first, preheat your oven to 350°F (175°C). This step is crucial for achieving that perfect bake. While the oven warms up, line a baking sheet with parchment paper. This not only prevents sticking but also makes cleanup a breeze. Trust me, your future self will thank you for this little effort!
Step 2: Mix Dry Ingredients
In a medium bowl, whisk together the all-purpose flour, cocoa powder, baking powder, and salt. This step is essential for evenly distributing the leavening agents and flavors. Make sure there are no lumps in the flour. A smooth mixture will lead to beautifully textured cookies. It’s like giving your cookies a solid foundation!
Step 3: Cream Butter and Sugar
In a separate large bowl, cream the softened unsalted butter and granulated sugar together until the mixture is light and fluffy. This usually takes about 2-3 minutes with an electric mixer. The fluffiness is key; it helps incorporate air, making your cookies soft and chewy. It’s like a little workout for your mixer, but totally worth it!
Step 4: Combine Wet Ingredients
Now, add the large egg, red food coloring, and vanilla extract to the butter mixture. Mix until everything is well combined. The vibrant red color will start to shine through, and the aroma of vanilla will fill your kitchen. It’s a delightful moment that makes you feel like a baking superstar!
Step 5: Form the Dough
Gradually add the dry ingredients to the wet mixture, stirring until a dough forms. Don’t overmix; just combine until you see no more flour. The dough should be soft and slightly sticky. This is where the magic happens, as the flavors meld together to create that signature red velvet taste!
Step 6: Chill the Dough
Chill the dough in the refrigerator for about 30 minutes. This step is important because it helps the cookies maintain their shape while baking. Plus, it makes the dough easier to handle. Think of it as giving your cookies a little spa day before they hit the oven!
Step 7: Shape the Cookies
Once the dough is chilled, scoop out tablespoon-sized portions and roll them into balls. I like to use a cookie scoop for uniformity, but your hands work just as well. The key is to make them about the same size so they bake evenly. It’s like creating little red velvet treasures!
Step 8: Coat in Powdered Sugar
Roll each dough ball in powdered sugar until fully coated. This snowy layer not only adds sweetness but also creates that beautiful crinkle effect as they bake. It’s like dressing your cookies in a fancy outfit for their big debut in the oven!
Step 9: Bake the Cookies
Place the cookies on the prepared baking sheet, spacing them about 2 inches apart. Bake for 10-12 minutes, or until the edges are set but the centers remain soft. Keep an eye on them; you want that perfect balance of chewy and soft. The aroma wafting through your kitchen will be heavenly!
Step 10: Cool and Enjoy
After baking, let the cookies cool on the baking sheet for a few minutes before transferring them to a wire rack. This helps them firm up a bit. Once they’re cool, it’s time to enjoy! Serve them warm with a glass of milk or share them with loved ones. You’ve just created a delightful treat!
Tips for Success
- Make sure your butter is softened for easy creaming.
- Don’t skip the chilling step; it’s crucial for the perfect texture.
- Use a cookie scoop for uniform cookie sizes.
- Experiment with food coloring for a deeper red hue.
- Store cookies in an airtight container to keep them fresh.
Equipment Needed
- Baking sheet: A standard cookie sheet works well, but a stoneware pan can give you a nice even bake.
- Parchment paper: If you don’t have this, a silicone baking mat is a great alternative.
- Mixing bowls: Use any size, but a large bowl is best for creaming.
- Electric mixer: A hand mixer is perfect, but a whisk and some elbow grease will do!
- Cookie scoop: If you don’t have one, just use a tablespoon for portioning the dough.
Variations of Red Velvet Crinkle Cookies
- Chocolate Chip Red Velvet Crinkle Cookies: Add a cup of semi-sweet chocolate chips to the dough for a delightful chocolatey twist.
- Nutty Red Velvet Crinkle Cookies: Incorporate chopped walnuts or pecans for a crunchy texture that complements the soft cookie.
- Gluten-Free Version: Substitute all-purpose flour with a gluten-free flour blend to make these cookies suitable for gluten-sensitive friends.
- Dairy-Free Option: Use coconut oil or a dairy-free butter substitute in place of unsalted butter for a dairy-free treat.
- Red Velvet Crinkle Cookie Sandwiches: Spread cream cheese frosting between two cookies for a decadent dessert experience.
Serving Suggestions for Red Velvet Crinkle Cookies
- Pair these cookies with a tall glass of cold milk for a classic treat.
- Serve them alongside a scoop of vanilla ice cream for an indulgent dessert.
- For a festive touch, arrange them on a decorative platter with fresh berries.
- Drizzle with white chocolate for an elegant presentation.
FAQs about Red Velvet Crinkle Cookies
Can I use a different type of food coloring?
Absolutely! While red food coloring gives these cookies their signature look, you can experiment with other colors. Just keep in mind that the flavor may slightly change depending on the type of coloring used.
How do I store leftover Red Velvet Crinkle Cookies?
To keep your cookies fresh, store them in an airtight container at room temperature. They’ll stay delicious for up to a week. If you want to keep them longer, consider freezing them!
Can I make the dough ahead of time?
Yes! You can prepare the dough in advance and refrigerate it for up to 2 days. Just remember to let it sit at room temperature for a few minutes before rolling and baking.
What can I do if my cookies spread too much while baking?
If your cookies spread too much, it could be due to warm dough. Make sure to chill the dough adequately before baking. Also, ensure your butter is softened, not melted, for the right texture.
Can I add nuts or chocolate chips to the dough?
Definitely! Adding nuts or chocolate chips can enhance the flavor and texture of your Red Velvet Crinkle Cookies. Just fold them in gently after combining the wet and dry ingredients.
Final Thoughts
Making Red Velvet Crinkle Cookies is more than just baking; it’s about creating sweet memories in the kitchen. The vibrant color and delightful taste bring joy to any occasion, whether it’s a family gathering or a cozy night in. I love how these cookies can turn an ordinary day into something special with just a few simple ingredients. Plus, the smiles on my loved ones’ faces when they take that first bite? Priceless! So, roll up your sleeves, embrace the mess, and enjoy the delicious journey of baking these delightful treats. You won’t regret it!
Print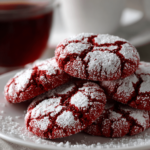
Red Velvet Crinkle Cookies that Everyone Will Love!
- Total Time: 45 minutes
- Yield: 24 cookies 1x
- Diet: Vegetarian
Description
Deliciously soft and chewy red velvet crinkle cookies that are perfect for any occasion.
Ingredients
- 2 cups all-purpose flour
- 1 tablespoon cocoa powder
- 1 teaspoon baking powder
- 1/2 teaspoon salt
- 1/2 cup unsalted butter, softened
- 1 cup granulated sugar
- 1 large egg
- 1 tablespoon red food coloring
- 1 teaspoon vanilla extract
- 1/2 cup powdered sugar for dusting
Instructions
- Preheat your oven to 350°F (175°C) and line a baking sheet with parchment paper.
- In a bowl, whisk together the flour, cocoa powder, baking powder, and salt.
- In a separate bowl, cream the softened butter and granulated sugar until light and fluffy.
- Add the egg, red food coloring, and vanilla extract to the butter mixture and mix until well combined.
- Gradually add the dry ingredients to the wet ingredients and mix until a dough forms.
- Chill the dough in the refrigerator for about 30 minutes.
- Once chilled, scoop out tablespoon-sized portions of dough and roll them into balls.
- Roll each ball in powdered sugar until fully coated.
- Place the cookies on the prepared baking sheet, spacing them about 2 inches apart.
- Bake for 10-12 minutes or until the edges are set but the centers are still soft.
- Allow the cookies to cool on the baking sheet for a few minutes before transferring them to a wire rack to cool completely.
Notes
- For a more intense red color, add more food coloring as desired.
- Store cookies in an airtight container for up to a week.
- These cookies can be frozen for up to 3 months.
- Prep Time: 15 minutes
- Cook Time: 12 minutes
- Category: Dessert
- Method: Baking
- Cuisine: American
Nutrition
- Serving Size: 1 cookie
- Calories: 150
- Sugar: 10g
- Sodium: 50mg
- Fat: 7g
- Saturated Fat: 4g
- Unsaturated Fat: 2g
- Trans Fat: 0g
- Carbohydrates: 20g
- Fiber: 1g
- Protein: 2g
- Cholesterol: 20mg
Keywords: Red Velvet Crinkle Cookies, Cookies, Dessert, Baking