Introduction to Pastel Sprinkle Sugar Cookie Bars
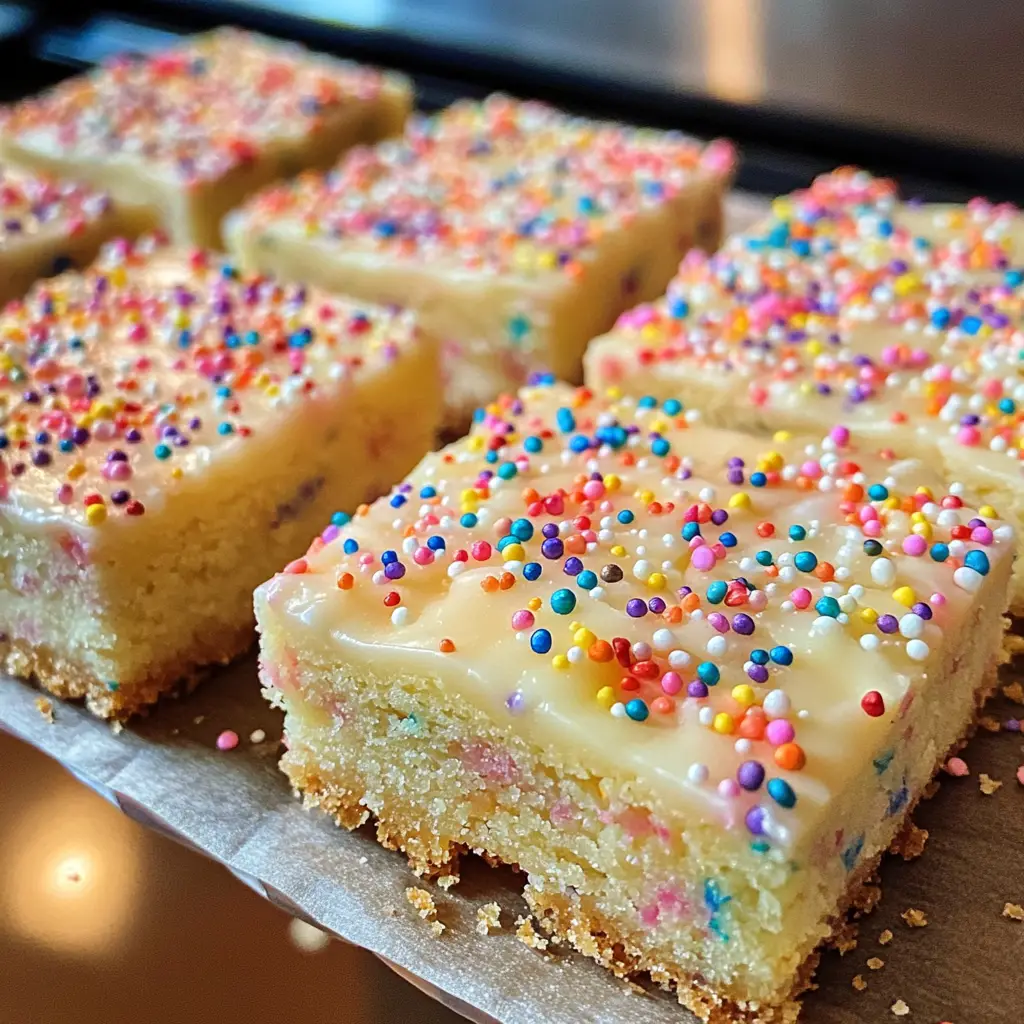
As a passionate home cook, I find joy in creating sweet treats that bring smiles to faces. One of my all-time favorites is the Pastel Sprinkle Sugar Cookie Bars. These delightful bars are not just a dessert; they are a celebration of color, flavor, and nostalgia. I remember the first time I made them for a family gathering. The moment I pulled them out of the oven, the warm, buttery aroma filled the kitchen, wrapping around me like a cozy blanket. It was a moment of pure magic.
What I love most about these cookie bars is their versatility. They are perfect for any occasion, whether it’s a birthday party, a holiday gathering, or just a cozy night in with a cup of tea. The pastel sprinkles add a whimsical touch, making them visually appealing and fun to eat. Each bite is a soft, chewy delight that melts in your mouth, leaving you craving more.
In this recipe, I’ll share not only the steps to create these scrumptious bars but also some personal tips and tricks that I’ve learned along the way. From choosing the right ingredients to the best baking techniques, I want to ensure your experience is as delightful as mine. So, grab your apron, and let’s embark on this sweet adventure together!
Ingredients for Pastel Sprinkle Sugar Cookie Bars
Before we dive into the baking process, let’s gather all the ingredients you’ll need to create these delightful Pastel Sprinkle Sugar Cookie Bars. I always believe that quality ingredients make a world of difference in baking. So, let’s make sure we have everything ready!
Main Ingredients
- 1 cup unsalted butter, softened (I prefer using high-quality butter for a richer flavor)
- 1 cup granulated sugar
- 1 cup brown sugar, packed (This adds a lovely depth of flavor)
- 2 large eggs
- 1 teaspoon vanilla extract (Pure vanilla extract is best for that aromatic touch)
- 3 cups all-purpose flour
- 1 teaspoon baking powder
- 1/2 teaspoon baking soda
- 1/2 teaspoon salt
- 1 cup pastel sprinkles (These are the stars of the show!)
Optional Add-ons
- 1/2 cup white chocolate chips (for an extra sweet surprise)
- 1/2 cup chopped nuts (like walnuts or pecans for a crunchy texture)
- Additional sprinkles for topping (because who doesn’t love more sprinkles?)
Feel free to mix and match these optional add-ons based on your preferences. I often toss in some white chocolate chips for a creamy contrast to the sweetness of the cookie bars. Remember, baking is all about creativity, so don’t hesitate to experiment!
How to Prepare Pastel Sprinkle Sugar Cookie Bars
Now that we have all our ingredients ready, it’s time to roll up our sleeves and get baking! I love the process of making Pastel Sprinkle Sugar Cookie Bars because it’s like a little dance in the kitchen. Each step brings us closer to that sweet, colorful treat. Let’s get started!
Step 1: Preheat the Oven and Prepare the Baking Dish
First things first, preheat your oven to 350°F (175°C). This step is crucial because a properly heated oven ensures even baking. While the oven warms up, grab a 9×13 inch baking dish and line it with parchment paper. This makes it super easy to lift the bars out later.
Tips for Step 1
- Make sure to leave some overhang with the parchment paper. It acts like a handle when you’re ready to cut the bars!
- If you don’t have parchment paper, you can lightly grease the dish with butter or cooking spray.
Step 2: Mix the Dry Ingredients
In a medium bowl, whisk together the flour, baking powder, baking soda, and salt. This step helps to evenly distribute the leavening agents, ensuring your cookie bars rise beautifully.
Tips for Step 2
- Use a sifter if you have one! It helps to aerate the flour and makes for lighter bars.
- Don’t skip the salt! It enhances the sweetness and balances the flavors.
Step 3: Cream the Butter and Sugar
In a large mixing bowl, beat the softened butter, granulated sugar, and brown sugar together until the mixture is light and fluffy. This usually takes about 2-3 minutes. The fluffiness is key to achieving that melt-in-your-mouth texture!
Tips for Step 3
- Make sure your butter is at room temperature. Cold butter won’t cream well!
- Use an electric mixer for the best results, but a good old-fashioned whisk works too if you’re feeling strong!
Step 4: Combine Wet and Dry Ingredients
Next, add the eggs and vanilla extract to the butter-sugar mixture. Mix until well combined. Gradually add the dry ingredients to the wet mixture, stirring until just combined. Be careful not to overmix; we want our bars to be soft and chewy!
Tips for Step 4
- Scrape down the sides of the bowl to ensure everything is mixed evenly.
- If the dough seems too dry, a splash of milk can help bring it together.
Step 5: Fold in the Sprinkles
Now comes the fun part! Gently fold in the pastel sprinkles. I always feel like a kid again when I see those colorful bits swirling into the dough. It’s like adding a sprinkle of joy!
Tips for Step 5
- Be gentle when folding to avoid breaking the sprinkles. We want them to stay vibrant and pretty!
- Save a few sprinkles to sprinkle on top before baking for an extra pop of color.
Step 6: Bake the Cookie Bars
Spread the dough evenly into the prepared baking dish. Bake in the preheated oven for about 20-25 minutes, or until the edges are lightly golden and a toothpick inserted in the center comes out clean.
Tips for Step 6
- Keep an eye on the bars as they bake. Ovens can vary, and you don’t want them to overbake!
- For a softer center, take them out when they’re just set and slightly underbaked.
Step 7: Cool and Cut into Bars
Once baked, remove the dish from the oven and let it cool in the pan for about 10 minutes. Then, lift the bars out using the parchment paper and let them cool completely on a wire rack. Once cool, cut them into squares or rectangles, and get ready to enjoy!
Tips for Step 7
- Use a sharp knife for clean cuts. Wipe the knife with a damp cloth between cuts for neat edges.
- These bars can be stored in an airtight container for up to a week, but I doubt they’ll last that long!
Equipment Needed for Pastel Sprinkle Sugar Cookie Bars
Before we dive into the baking, let’s make sure we have all the right tools at our fingertips. Having the right equipment can make the process smoother and more enjoyable. Here’s what you’ll need to whip up those delightful Pastel Sprinkle Sugar Cookie Bars:
- Mixing Bowls: A large bowl for creaming the butter and sugars, and a medium bowl for mixing the dry ingredients. If you don’t have a set, any large bowl will do!
- Electric Mixer: This is my go-to for creaming butter and sugar. However, a whisk works just as well if you’re up for a little workout!
- Measuring Cups and Spoons: Accurate measurements are key in baking. If you don’t have these, you can use a kitchen scale for precision.
- Rubber Spatula: Perfect for folding in those colorful sprinkles and scraping down the sides of the bowl. A wooden spoon can also do the trick!
- Baking Dish: A 9×13 inch baking dish is ideal. If you don’t have one, a similar-sized pan will work, but keep an eye on the baking time.
- Parchment Paper: This makes for easy removal of the bars. If you’re out, greasing the pan with butter or cooking spray is a good alternative.
- Wire Rack: For cooling the bars. If you don’t have one, a plate or cutting board can work in a pinch.
With these tools in hand, you’re all set to create your own batch of pastel magic! Remember, the kitchen is a place for creativity, so feel free to adapt and use what you have. Happy baking!
Variations of Pastel Sprinkle Sugar Cookie Bars
As I’ve experimented with my Pastel Sprinkle Sugar Cookie Bars, I’ve discovered that there are endless ways to put a unique spin on this delightful treat. Each variation brings its own charm and flavor, making it even more fun to bake and share. Here are a few of my favorite twists:
- Chocolate Chip Delight: Swap out some of the flour for cocoa powder and add chocolate chips instead of sprinkles. This creates a rich, chocolatey version that’s perfect for chocolate lovers!
- Nutty Crunch: Incorporate chopped nuts like almonds or pecans into the dough for a delightful crunch. The nuttiness pairs beautifully with the sweetness of the cookie bars.
- Fruity Fun: Add dried fruits like cranberries or cherries for a burst of flavor. The tartness of the fruit balances the sweetness of the bars, creating a delightful contrast.
- Seasonal Sprinkles: Change up the sprinkles based on the season or holiday. Use red and green for Christmas, pastel colors for Easter, or vibrant hues for a summer picnic!
These variations not only keep things exciting but also allow you to tailor the bars to suit different tastes and occasions. I love how a simple change can transform the entire experience. So, don’t hesitate to get creative and make these cookie bars your own!
Cooking Notes for Pastel Sprinkle Sugar Cookie Bars
As I’ve baked my fair share of Pastel Sprinkle Sugar Cookie Bars, I’ve picked up a few cooking notes that can help elevate your baking experience. These little nuggets of wisdom can make a big difference in the final outcome!
- Room Temperature Ingredients: Always ensure your butter and eggs are at room temperature. This helps them blend more easily, creating a smoother batter.
- Don’t Overmix: When combining the wet and dry ingredients, mix just until combined. Overmixing can lead to tough bars instead of the soft, chewy texture we all love.
- Cooling Time: Allow the bars to cool completely before cutting. This helps them set properly and makes for cleaner cuts. Patience is key!
- Storage Tips: Store your cookie bars in an airtight container at room temperature. If you want to keep them fresh longer, you can refrigerate them, but I find they rarely last that long in my house!
- Experiment with Sprinkles: Different brands of sprinkles can behave differently when baked. Some may bleed color, while others hold their shape. I love using high-quality sprinkles for the best results!
These cooking notes are like little secrets I’ve gathered over the years. They help ensure that every batch of Pastel Sprinkle Sugar Cookie Bars turns out just as delightful as the last. Happy baking, and may your kitchen be filled with sweet aromas and joyful moments!
Serving Suggestions for Pastel Sprinkle Sugar Cookie Bars
When it comes to serving my Pastel Sprinkle Sugar Cookie Bars, I love to get a little creative! These bars are not only delicious but also visually appealing, making them perfect for any occasion. Here are some of my favorite serving suggestions that add a special touch:
- With a Scoop of Ice Cream: Serve warm bars with a scoop of vanilla or pastel-colored ice cream on top. The melting ice cream creates a delightful contrast with the chewy cookie bars.
- Drizzled with Chocolate: A simple drizzle of melted chocolate or white chocolate over the bars adds an elegant flair. It’s like giving them a little dress-up for a party!
- On a Dessert Platter: Arrange the bars on a colorful platter alongside fresh fruits or other treats. This makes for a beautiful dessert spread that’s sure to impress your guests.
- With a Cup of Tea or Coffee: Enjoy these bars with a warm cup of tea or coffee. The combination of flavors is comforting and perfect for a cozy afternoon snack.
- As Party Favors: Cut the bars into smaller squares and package them in cute bags or boxes. They make delightful party favors that guests can take home!
These serving suggestions not only enhance the experience but also allow you to share the joy of baking with others. Whether it’s a casual gathering or a festive celebration, my Pastel Sprinkle Sugar Cookie Bars are always a hit. So, get ready to spread some sweetness and enjoy every bite!
Tips for Making the Best Pastel Sprinkle Sugar Cookie Bars
As I’ve baked my fair share of Pastel Sprinkle Sugar Cookie Bars, I’ve gathered a treasure trove of tips that can help you achieve cookie bar perfection. These little nuggets of wisdom can make a world of difference in your baking journey. Here are my top tips to ensure your bars turn out as delightful as can be:
- Measure Accurately: Baking is a science, so precise measurements are key. Use measuring cups and spoons for dry ingredients and a liquid measuring cup for wet ingredients. This ensures the right balance of flavors and textures.
- Chill the Dough: If you have time, chilling the dough for about 30 minutes can enhance the flavor and texture. It helps the butter solidify, leading to thicker, chewier bars.
- Don’t Skip the Sprinkles: The pastel sprinkles are the stars of the show! Make sure to fold them in gently to keep their vibrant colors intact. Save a few to sprinkle on top before baking for an extra pop of fun!
- Check for Doneness: Ovens can vary, so keep an eye on your bars as they bake. They should be lightly golden around the edges but still soft in the center. A toothpick inserted should come out with a few moist crumbs.
- Let Them Cool: Patience is a virtue! Allow the bars to cool completely in the pan before cutting. This helps them set and makes for cleaner, prettier squares.
With these tips in your back pocket, you’re well on your way to creating the most scrumptious Pastel Sprinkle Sugar Cookie Bars. Remember, baking is all about having fun and enjoying the process. So, roll up your sleeves, and let your creativity shine!
Breakdown of Time for Pastel Sprinkle Sugar Cookie Bars
When it comes to baking, timing is everything! I always like to have a clear idea of how long each step will take, so I can plan my kitchen adventures accordingly. Here’s a quick breakdown of the time you’ll need to whip up these delightful Pastel Sprinkle Sugar Cookie Bars:
- Prep Time: Approximately 15-20 minutes. This includes gathering your ingredients, mixing the dough, and preparing the baking dish. It’s a fun and quick process that gets you excited for the baking ahead!
- Cooking Time: About 20-25 minutes. This is when the magic happens! Your kitchen will fill with the warm, buttery aroma of baking cookie bars, making it hard to resist sneaking a taste.
- Total Time: Roughly 40-45 minutes. In less than an hour, you’ll have a batch of colorful, chewy cookie bars ready to enjoy!
With this time breakdown, you can easily fit baking these Pastel Sprinkle Sugar Cookie Bars into your day. Whether it’s a weekend treat or a last-minute dessert for a gathering, you’ll be amazed at how quickly you can create something so delightful. Happy baking!
Nutritional Information for Pastel Sprinkle Sugar Cookie Bars
As a passionate home cook, I always find it helpful to know the nutritional information of the treats I bake. It allows me to enjoy them mindfully while sharing with family and friends. Here’s a general breakdown of the nutritional content for one serving (assuming you cut the batch into 24 bars) of Pastel Sprinkle Sugar Cookie Bars:
- Calories: Approximately 150-180 calories
- Fat: 7-9 grams (mostly from butter)
- Carbohydrates: 22-25 grams
- Fiber: 0.5 grams
- Sugar: 10-12 grams
- Protein: 1-2 grams
Keep in mind that these values can vary based on the specific ingredients you use and any optional add-ons you choose to include. For instance, adding white chocolate chips or nuts will increase the calorie count and fat content. I always encourage balance and moderation, so enjoy these delightful bars as part of a varied diet. After all, baking is about joy, and sharing sweet moments with loved ones is what it’s all about!
Frequently Asked Questions about Pastel Sprinkle Sugar Cookie Bars
As I’ve shared my love for Pastel Sprinkle Sugar Cookie Bars, I’ve often received questions from fellow bakers eager to try their hand at this delightful treat. I love connecting with others through baking, and I’m here to help! Here are some of the most frequently asked questions I encounter, along with my answers:
Can I use margarine instead of butter?
While I always recommend using unsalted butter for the best flavor, you can substitute margarine if needed. Just keep in mind that the texture and taste may vary slightly. Butter adds a richness that’s hard to replicate!
How do I store leftover cookie bars?
To keep your Pastel Sprinkle Sugar Cookie Bars fresh, store them in an airtight container at room temperature. They can last up to a week, but I find they rarely stick around that long in my house!
Can I freeze these cookie bars?
Absolutely! These bars freeze beautifully. Just wrap them tightly in plastic wrap and then place them in a freezer-safe container. They can be frozen for up to three months. When you’re ready to enjoy, simply thaw them at room temperature.
What can I use instead of eggs for a vegan version?
If you’re looking to make a vegan version, you can substitute each egg with 1/4 cup of unsweetened applesauce or a flax egg (1 tablespoon of ground flaxseed mixed with 2.5 tablespoons of water). This will help bind the ingredients together while keeping the bars moist.
Can I add more sprinkles?
Of course! Sprinkles are the star of the show, so feel free to add more for an extra burst of color and fun. Just remember to fold them in gently to keep them intact!
These questions reflect the curiosity and creativity that comes with baking. I love how baking can bring us together, and I hope these answers help you on your journey to creating the perfect Pastel Sprinkle Sugar Cookie Bars. If you have more questions, don’t hesitate to reach out. Happy baking!
Conclusion on Pastel Sprinkle Sugar Cookie Bars
As I wrap up this delightful journey of baking Pastel Sprinkle Sugar Cookie Bars, I can’t help but feel a sense of joy and satisfaction. These bars are more than just a sweet treat; they are a canvas for creativity, a source of nostalgia, and a way to bring people together. The vibrant pastel sprinkles add a playful touch, making them perfect for any occasion, from birthday parties to cozy family gatherings.
What I love most about this recipe is its simplicity. With just a handful of ingredients and straightforward steps, anyone can whip up a batch of these chewy, colorful bars. Plus, the variations and optional add-ons allow you to tailor them to your taste, making each batch uniquely yours. Whether you enjoy them warm out of the oven or as a delightful snack throughout the week, these cookie bars are sure to bring smiles and sweet moments to your home.
So, gather your ingredients, roll up your sleeves, and let the magic of baking unfold in your kitchen. I hope you enjoy making and sharing these Pastel Sprinkle Sugar Cookie Bars as much as I do. Happy baking!